What:
I’ve put together a system which I call “Magic Nodes” where we can write some C++ functions in-place on any Blueprint Graph and that node will “morph” to match the input and output parameters of the function we wrote within the node itself. Reasons behind why I built this is, in part, because there’s numerous tasks where dragging wires on Blueprint Editor slows down productivity and this tool could be useful to address that, sometimes it’s simply faster to type a few lines of code instead of dealing with wire spaghetti!
With this I also hope, with time, Blueprint developers have a first contact with C++ code and slowly become comfortable moving to Visual Studio workflow later on, if wanted.

We can type some code, compile (hot-reload), and the node will “morph” its pins to accommodate and execute the function we wrote inside of it.
This can be very handy for developers missing something in-between Blueprints and pure C++ code… Also it’s very useful to actually “read” right there what exactly that one node is doing.

While coding our functions in this node, we can have some basic auto-complete functionality as well. However keep in mind that I have no previous experience with any of this, turns out making an auto-complete feature is a beast of a complex task and I’ve implemented only the very basics!
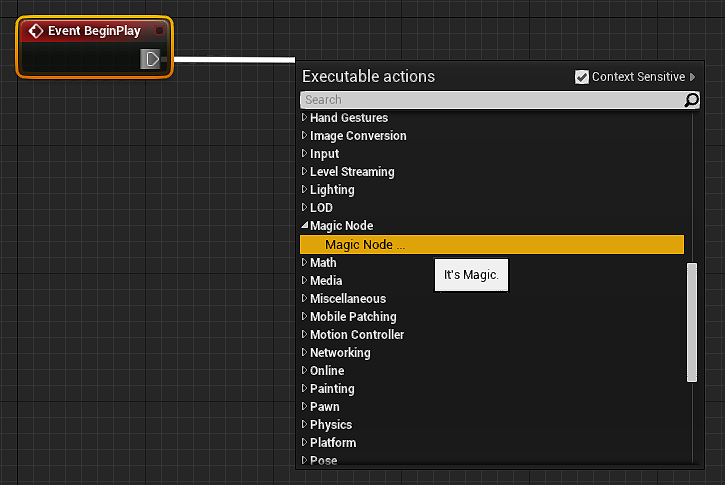
For example, in this screenshot the node detected I am trying to invoke a function from a ACharacter class, so while I was typing an auto-complete panel will popup, showing me functions and properties members of ACharacter class:

Workflow:
Here a quick intro of how these nodes are setup and how to make them work correctly for you…
Because this is “real C++” (encapsulated into a safer environment), but still C++, these nodes require your Unreal Project to be a C++ project in order to execute.
Magic Nodes rely on Unreal’s Hot-reload feature to be useful. The basic workflow:
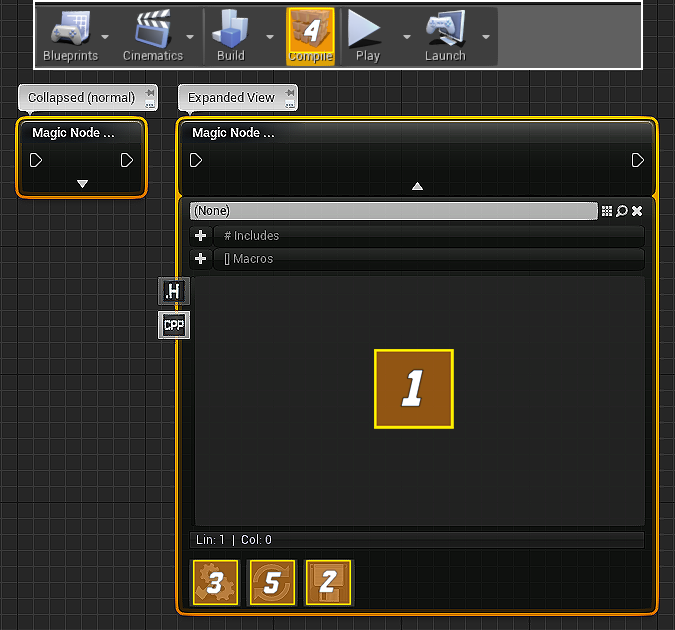
- Just like regular C++, you have a Header field (H) and a CPP field (CPP) where you can declare and define you node’s functions, respectively. Alternatively there’s also a Type field (T) where you can declare any additional types such as enums, structs or classes that your node will use at runtime to execute the code you create.
- Before compiling your changes, you have to save your node, that will update the “root source”, the source which stores your code and shares it with all the instances of your node. You can place on Blueprints multiple instances of your node, the source code to execute will be the same for all of the instances executed.
“Ctrl+S” works as a shortcut for this save button. - Once you’re happy with your code, you need to compile the node, this first button from the Node toolbar. This will run a pre-compilation system that will examine your code… If everything seems correct the this pre-compiler will do all the work necessary to generate (or update) a native C++ class which is what is going to be executed at runtime once your game is packaged. That means that this node is just a “shell” holding the entry point of where and when your C++ code will execute within your Blueprint Graph. The node itself is purely visual and in reality doesn’t do anything besides display to you what it is going to execute.
If the pre-compiler is happy with what it sees in your code you should hear a “success” beep sound confirming that it indeed generated the native node correctly. - If the pre-compiler is happy with your code, next step is to tell Unreal Engine to incorporate the node runtime into the Blueprint’s Graph execution flow. We do that by hitting the Hot-reload button from the main editor’s toolbar.
This step is where the actual C++ compiler kicks in and catch any deeper defective code you might be trying to compile; If you can’t get past this stage, it’s a good idea to ask C++ veterans on Unreal’s forums, usually they can point out what exactly is wrong with your code. - Once Hot-reload compilation is complete, this is where the “magic” part comes in… Click the refresh button and the node, now properly compiled to binary library, shall update its input and output pins to reflect the entry function in your code (“FSelf::Execute” function). Once pins are generated and/or updated, you can proceed to link your target variables to it and/or set default values of your pins.
Example:
Let’s create a node which takes a reference to our Character Blueprint, subscribes a native (node’s internal) function to Character’s “Jump” event and then tells the Character actor instance in game world to jump… This example characterizes as a “Persistent Node”, it keeps running like an Async Function such as Delay Nodes.
Of course, you could simply call the the “Jump” node instead and be done with it, but the point here is to exemplify how you can do that same action from Native C++ with magic nodes instead of calling one new Blueprint Virtual Machine‘s function for every single node you need to call (VM function calls in the end have heavy performance implications, they are orders of magnitude slower than native code and many developers end up converting good portions of their code to C++ because of that). The fact that we can add hundreds of functions to a Magic Node’s source and a call to that node is going to be just ONE call from the Virtual Machine, that’s a performance boost to be considered while at same time we don’t have to deal much with complex plugin modules setup (lot’s of boilerplate code) just to run our functions is also a workflow improvement, there’s much less support code to write on Magic Nodes…
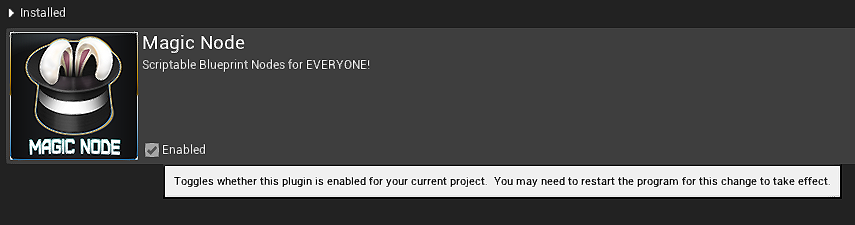
So, make sure that you have Magic Node plugin installed and properly activated:
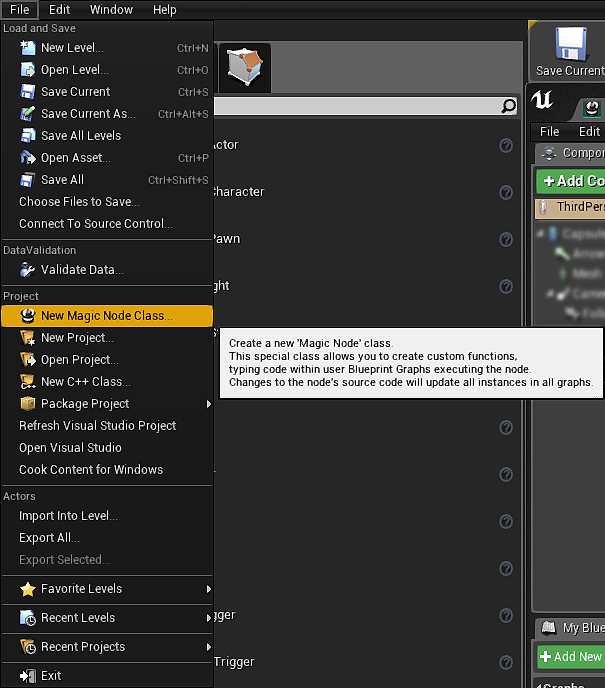
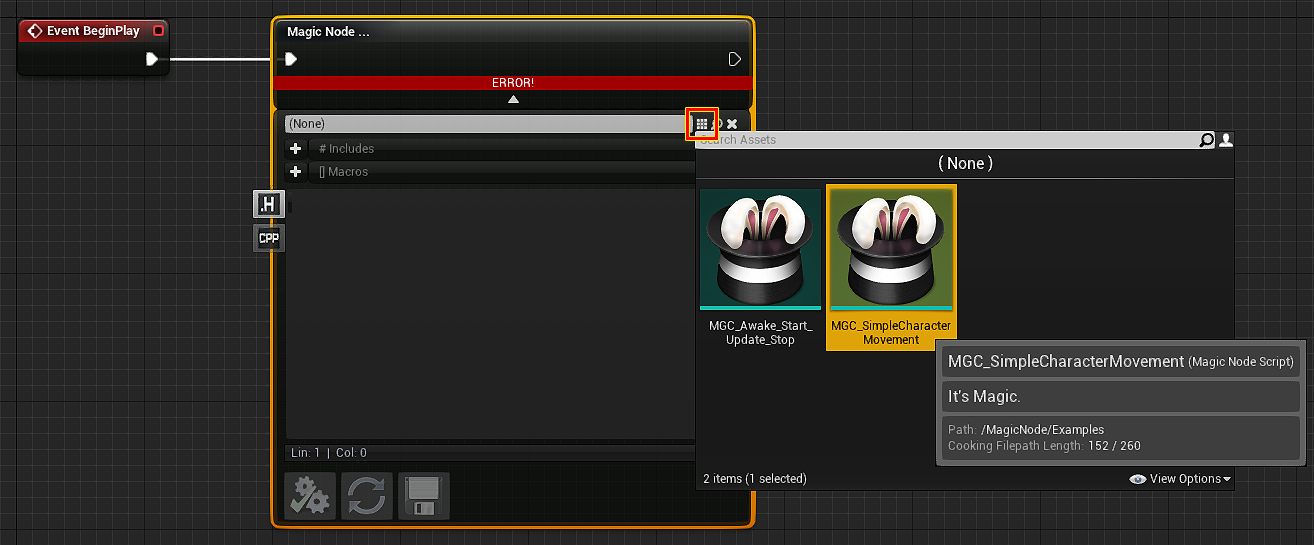
First we will need to create our “source”. We can do this from File -> Project -> “New Magic Node Class…“; That will create a new Magic Node pack in your content browser:
Once the source is created and named, let’s forget about it for now. Let’s go to our Character Blueprint and add a new Magic Node to its Graph:

We now have a “shell” to execute our node. By default it is empty, if you try to compile the Character Blueprint you’ll see Unreal’s Blueprint Compiler to complain about it:

So, that source pack we have created before, we need to tell our shell to use that source we have created, for that we use the asset picker right below that error message on the node, it will bind this shell node to our source so we can start coding our functions in it:
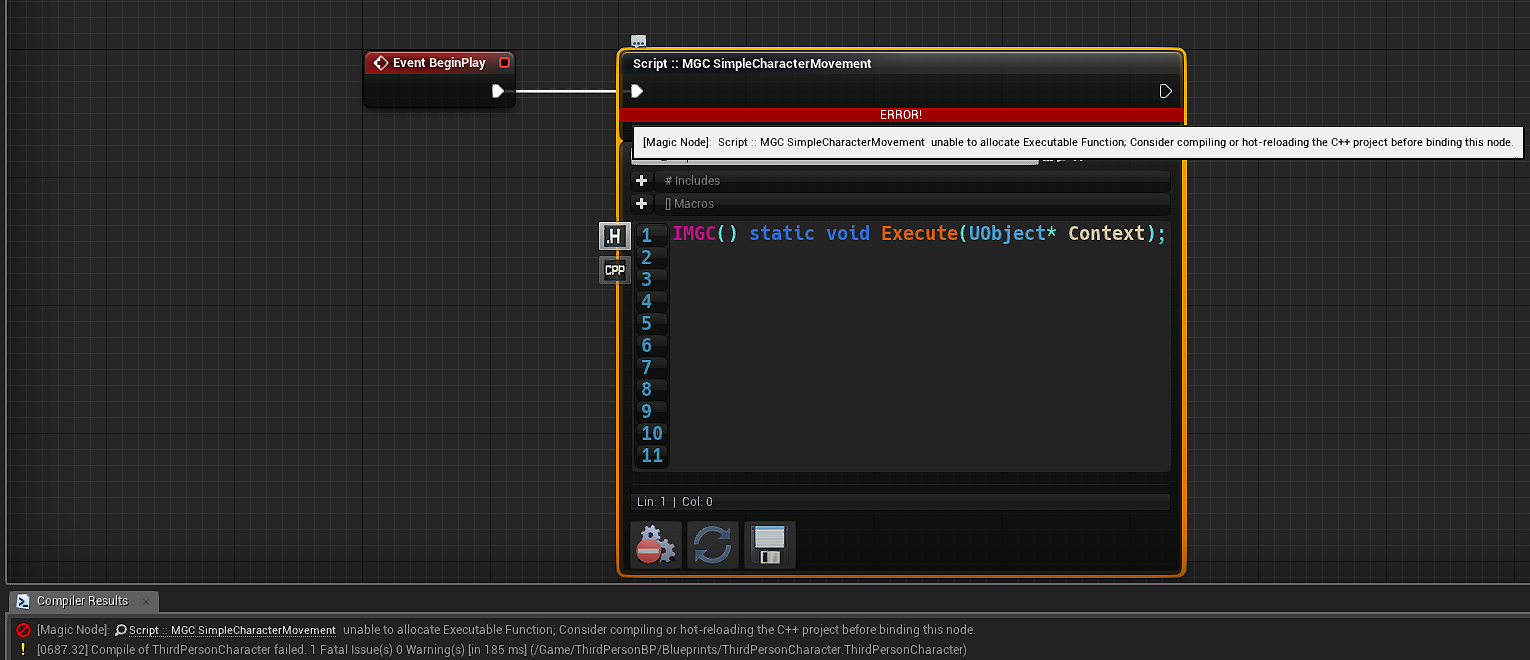
Now we have our source and the node shall become editable. If we try to compile our Character Blueprint once again, you might notice that it now recognizes our Magic Node as valid, however it will now complain it can’t allocate the entry point “Execute” function even though we can see it is there in our source. The reason why it is that way is because the runtime C++ only cares about compiled binaries, it doesn’t care or interact with any components of the Blueprint’s Virtual Machine:
We don’t have to care about that right now, let’s proceed and create our node’s code.
To make it work, we’re going to directly use two member classes of Unreal’s Game Framework, Character class and Input Component class. To use them, we have to include the path to their respective header files; if you’re not sure where those headers are located you can type their types in your script ( ACharacter, UInputComponent ) then Ctrl+LMB them: The Magic Node will launch your browser and search Unreal’s API website for your looking for those classes pages. If the page exists, you should be redirected to these pages, at the bottom of the pages you can find the paths to their headers, here:
GameFramework/ACharacter/
Components/UInputComponent/
Click the “+” sign of # Includes row to include their paths:

Done that, we now need to type some code to achieve our goal.
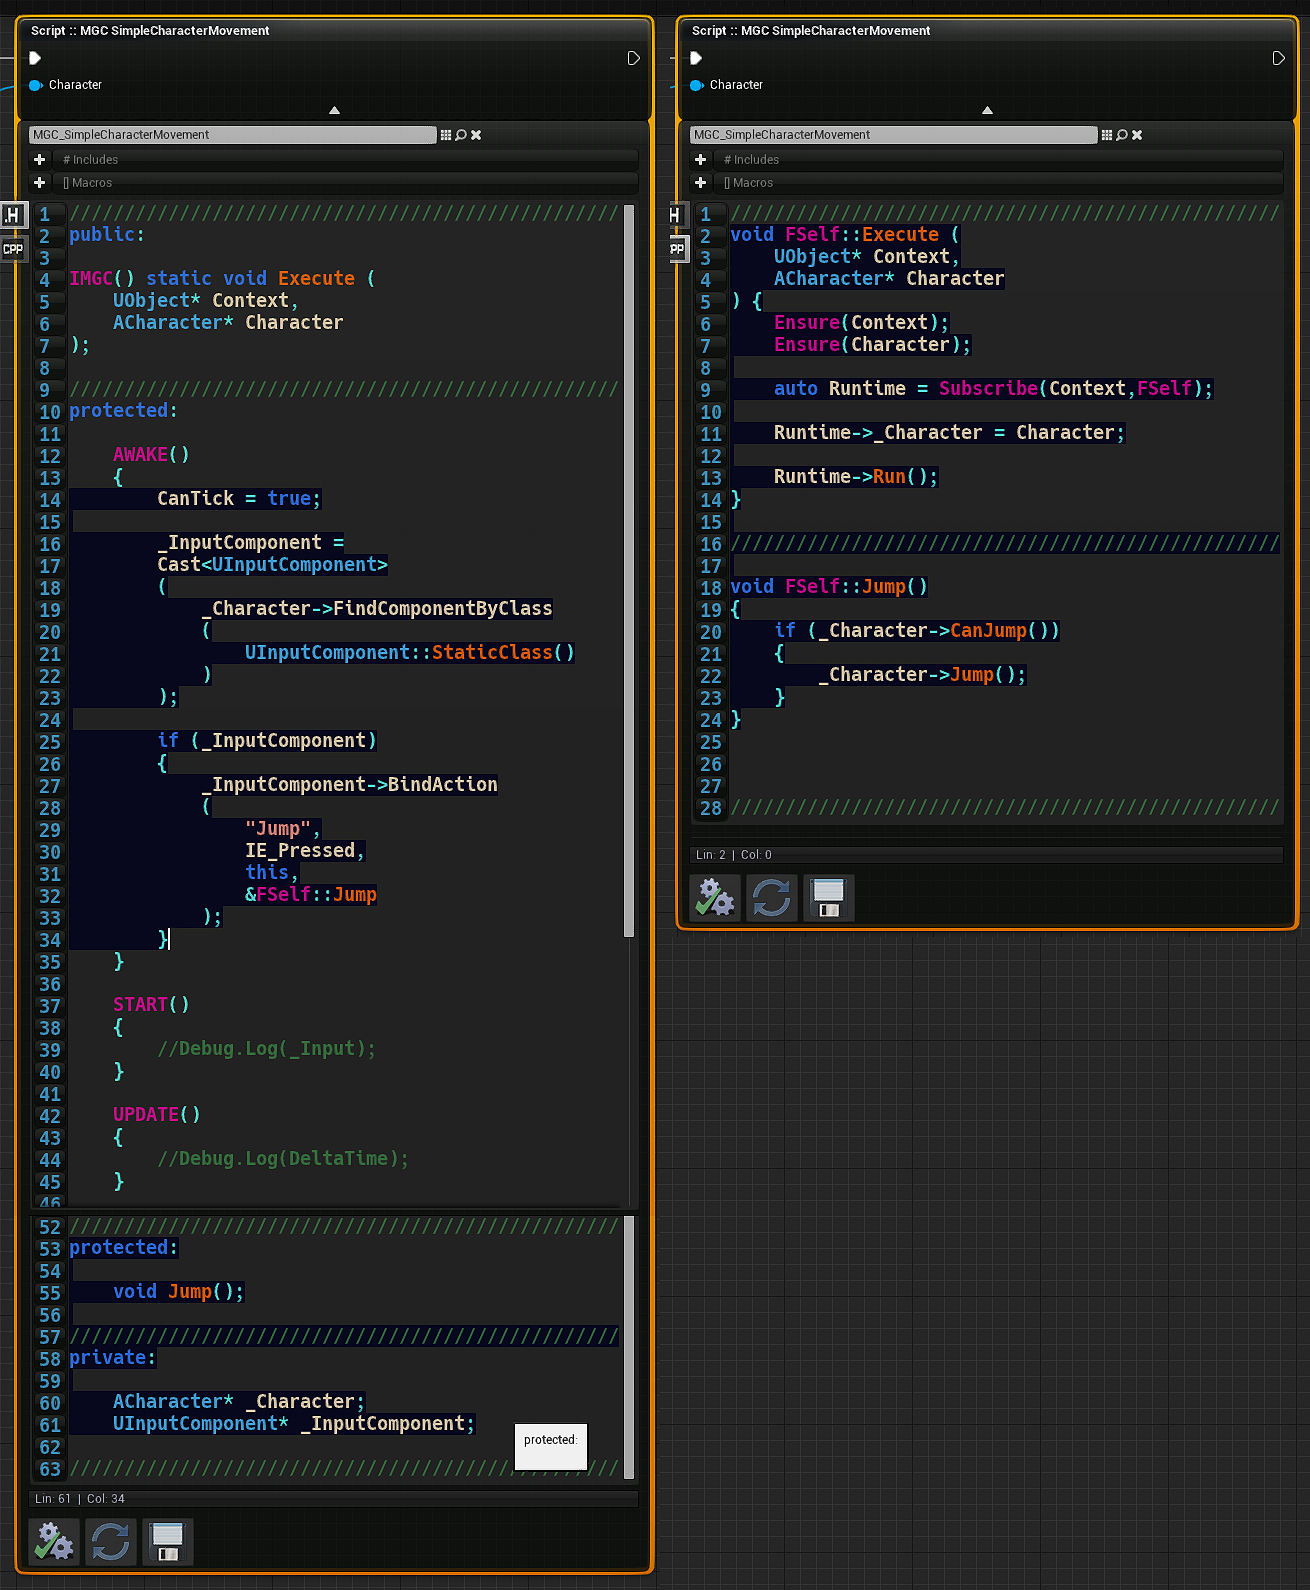
Let’s add this functionality to our H section and CPP section of the node
(don’t worry about the “Character” pin already visible here, that is only there because I have already compiled this node).
Code to the left goes within the Header (H), right one goes within the CPP section:
FIX:
Epic Games team added the same “Subscribe()” function to Unreal Engine on 4.24 and above. To avoid problems then we have to use now “Enroll()” macro inside of Execute function, instead of the “Subscribe()” you see above.
Done that, let’s now save and pre-compile our node, from the node’s toolbar:

Then tell Unreal to compile the binary version of our node.
Clicking the Hot-reload button:

Once Hot-reload compilation is complete, let’s head back to our node’s toolbar and click the “Refresh” button:

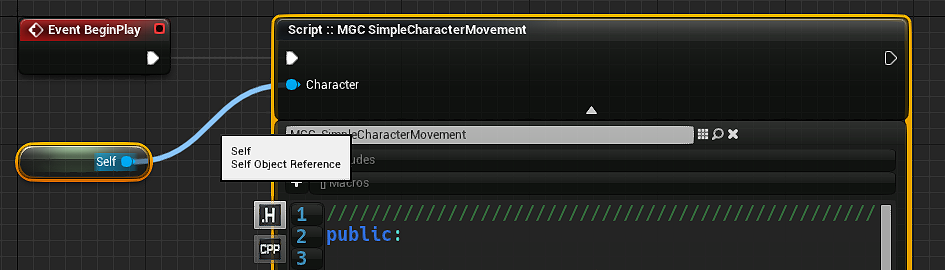
Done that, we shall now see that your Magic Node now displays an input pin called “Character”. Let’s attach to it a variable of our Character’s self Blueprint:
If you did everything correctly, now compile the Character Blueprint (Blueprint toolbar, not Hot-Reload) and then your Character Blueprint should now be happy and understand what have just made; When playing in editor, if you press the space key the character will jump (make sure you have input settings setup on project settings panel):
And that’s it, a quick example of how to run native C++ code on Blueprint Graphs without leaving the Blueprint Editor to work on external applications such as Visual Studio!
If you leave the game running for a while though, the code will stop working…
That will happen because Unreal will run a Garbage Collection operation and our Magic Node running will be destroyed. It’s simple to avoid that, because our node is latent (Persistent Node), we don’t want it to be garbage collected, so we just have to change the declaration and definition body of our “Execute” to output a self-reference, like this:

Then we save the script, pre-compile again, Hot-reload again and now after Refresh our node has an output pin. We promote the output to a variable (here named “Controller Script“) and make the Character Blueprint hold a reference to it, so while our Character Blueprint exists the Magic Node will never be garbage collected:

When we are done with it and want the node to be destroyed, all we have to do is set the variable “Controller Script” to null pointer. The next time Garbage Collector runs it will collect the remains of our node and destroy it as expected!
But what if we don’t need a persistent node?
In this case it’s way simpler. We can write the whole functionality within the entry point “Execute” function. Doing so will NOT generate any garbage and the Magic Node will be a “Fire & Forget” type of node, it will be destroyed right after execution flow (white wires) leaves the Magic Node, just like any regular Blueprint nodes!
Like this example node shown previously:
So, I’m running out of time for now, this should illustrate how the general workflow is meant to be when you create Magic Nodes. If you have doubts and questions, feel free to ask in the Unreal Engine’s public forums (link below).
Note:
When you want your C++ classes to reference and use Magic Node classes from the Source/MagicNodes/ directoy, besides including a node’s respective class header, make sure you add the “MagicNodeRuntime” module dependency to your project as well:

“-We don’t make mistakes, just happy little accidents!” — Bob Ross
Happy coding!
You can find more about this tool and contribute feedback on Unreal Engine’s forums here: https://forums.unrealengine.com
