Building a Fully Procedural Asset Editor Inside Unreal Engine 5
When most developers hear “procedural generation,” they think of random terrain or dungeon systems running in runtime Blueprints. What we’ve built here is something entirely different: a self-contained procedural asset generator that lives natively inside Unreal Engine’s Editor.
It constructs geometry, materials, and metadata from scratch within a custom asset editor, entirely written in C++ using Unreal’s modern GeometryScript and Dynamic Mesh Framework.
The Philosophy: Procedural as a Creative Amplifier
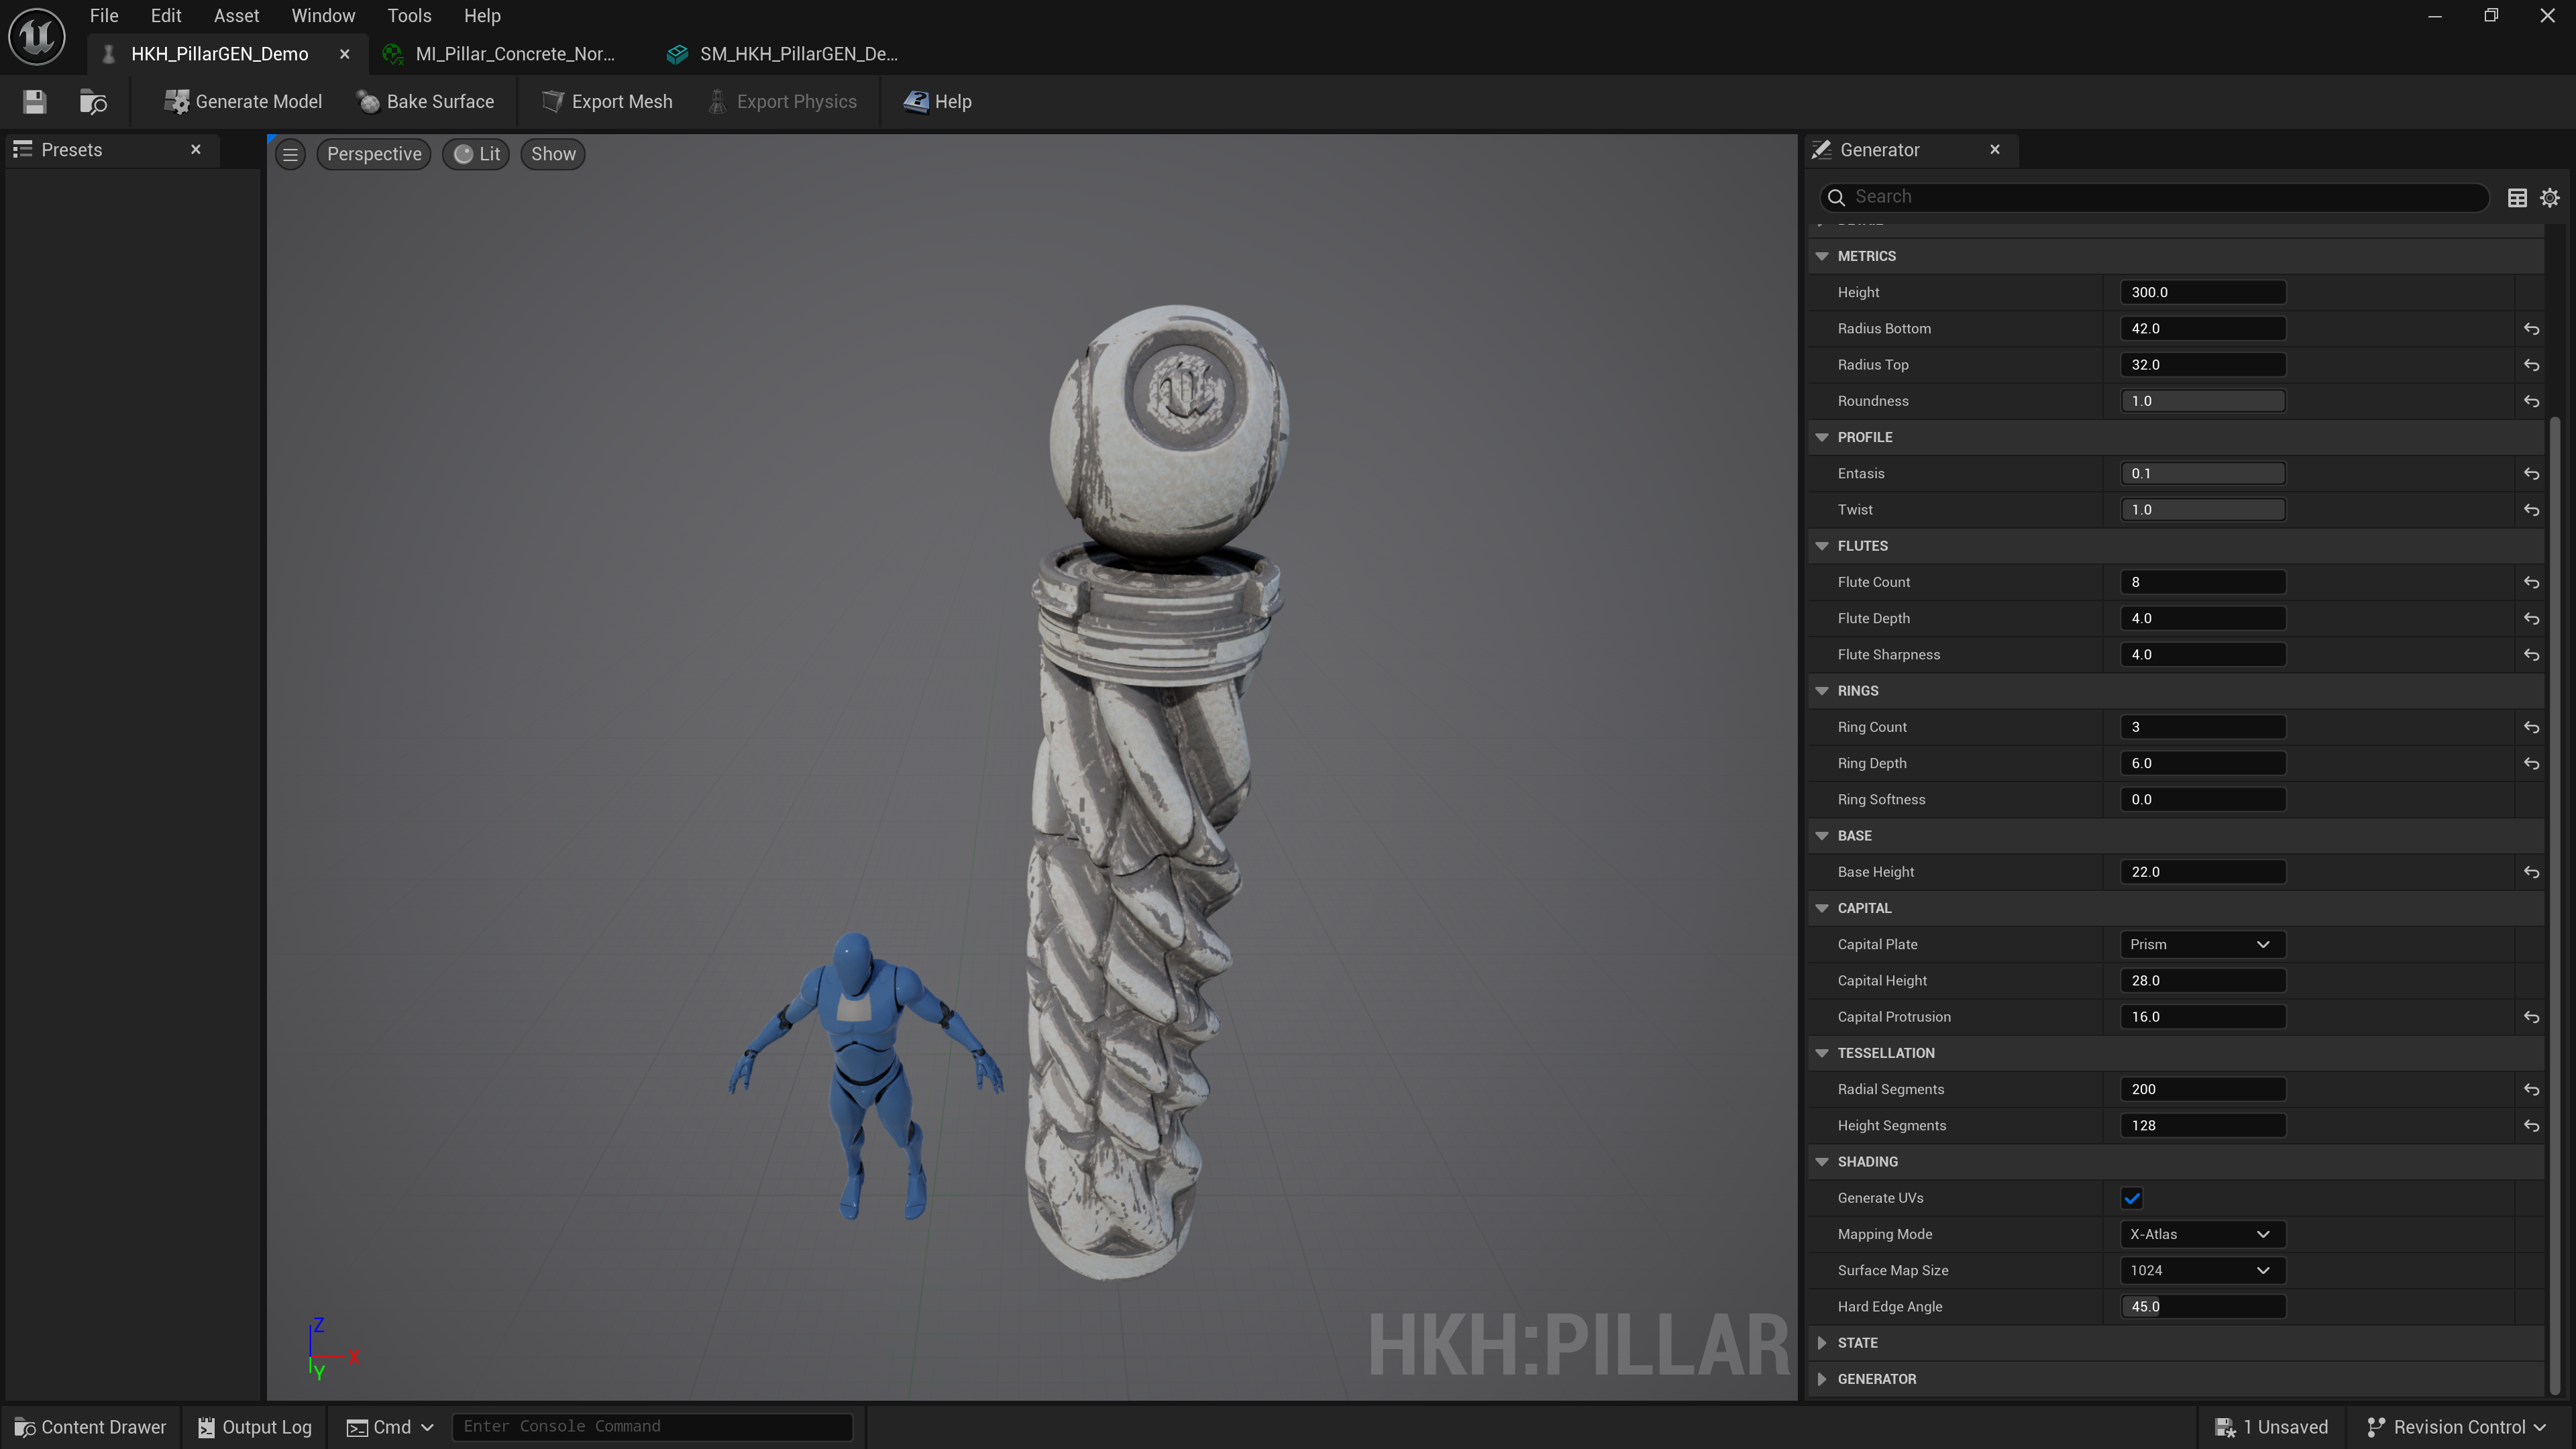
The HKH Pillar Generator was designed with one goal — to empower artists and designers to generate production-ready architectural assets in seconds, with complete control over geometry fidelity, tessellation, UVs, and material presets.
This tool isn’t just a parametric mesh spawner. It bakes surface maps, exports physics-ready collision meshes, generates Nanite-enabled static meshes, and wraps everything in a clean Editor UI for iteration and export. Everything is procedural, but the results are handcrafted-quality.
The Challenge: Building a Native Generator in the Unreal Editor
Creating an Editor-integrated generator meant avoiding the common “Editor Utility Widget” approach that hobbyist projects rely on. Those are fine for quick scripts — but this project demanded native speed, type safety, and data persistence.
We implemented a dedicated SHKHPillarGenEditor toolkit, a custom Editor Mode with Slate widgets, parameter reflection, and viewport previews. Every tweak to height, radius, flute count, or twist dynamically rebuilds the mesh in memory through the UDynamicMesh API, streaming data directly to the viewport renderer.
This level of integration required working intimately with:
GeometryScript Mesh Generation Libraries
FDynamicMesh3, FDynamicMeshNormals, and FDynamicMeshTangents
Custom FSlate UI bindings for real-time parameter updates
Procedural material instance creation via UMaterialInstanceDynamic
These aren’t exposed to Blueprint. You need deep C++ access and understanding of Unreal’s geometry core to make them perform efficiently.
The Math Behind the Columns
The procedural geometry pipeline is built on a mathematical foundation rather than relying on canned assets.
Each pillar is defined by canonical structs such as:
The entasis and twist parameters are computed through trigonometric deformation of vertex positions along the Z-axis:
float Z = Vertex.Z / Height;
float R = FMath::Lerp(RadiusBottom, RadiusTop, Z + FMath::Pow(Z, Entasis));
Vertex.X = R * FMath::Cos(Angle + Twist * Z);
Vertex.Y = R * FMath::Sin(Angle + Twist * Z);
The result: mathematically correct, curvature-accurate columns that rival real architectural references — not noisy displacement maps or Boolean junk.
Self-Contained Export Pipeline
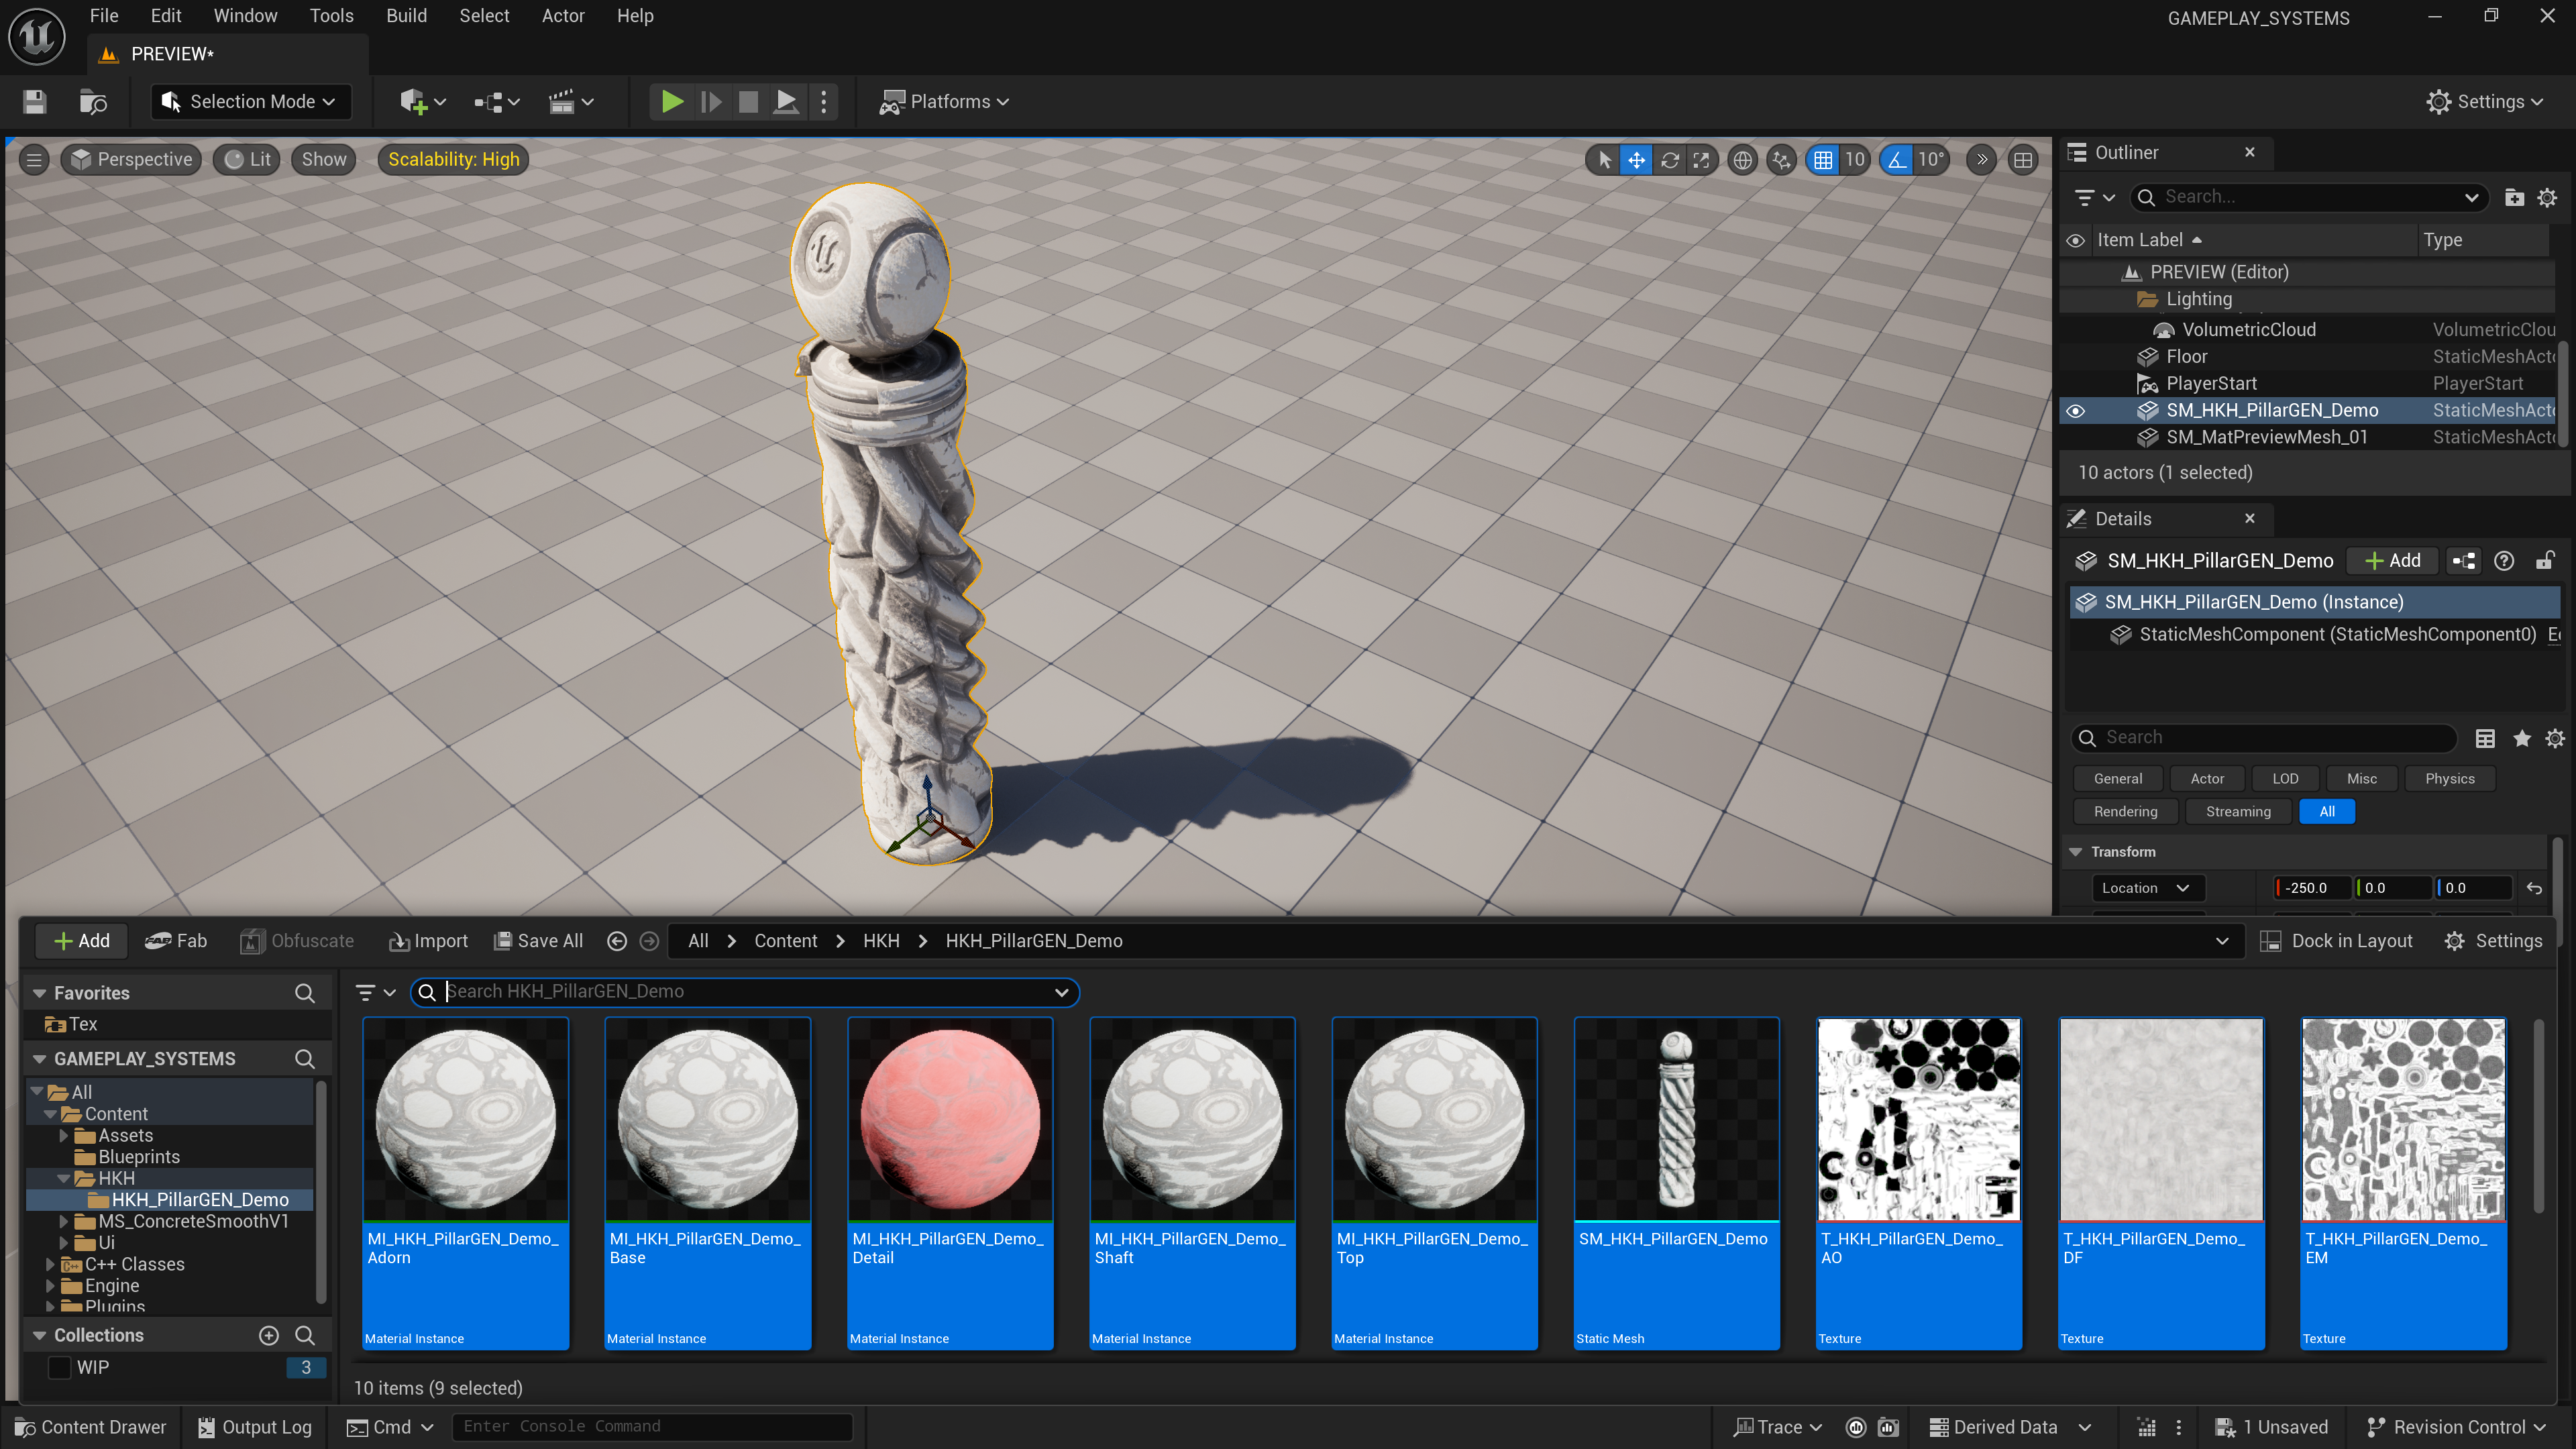
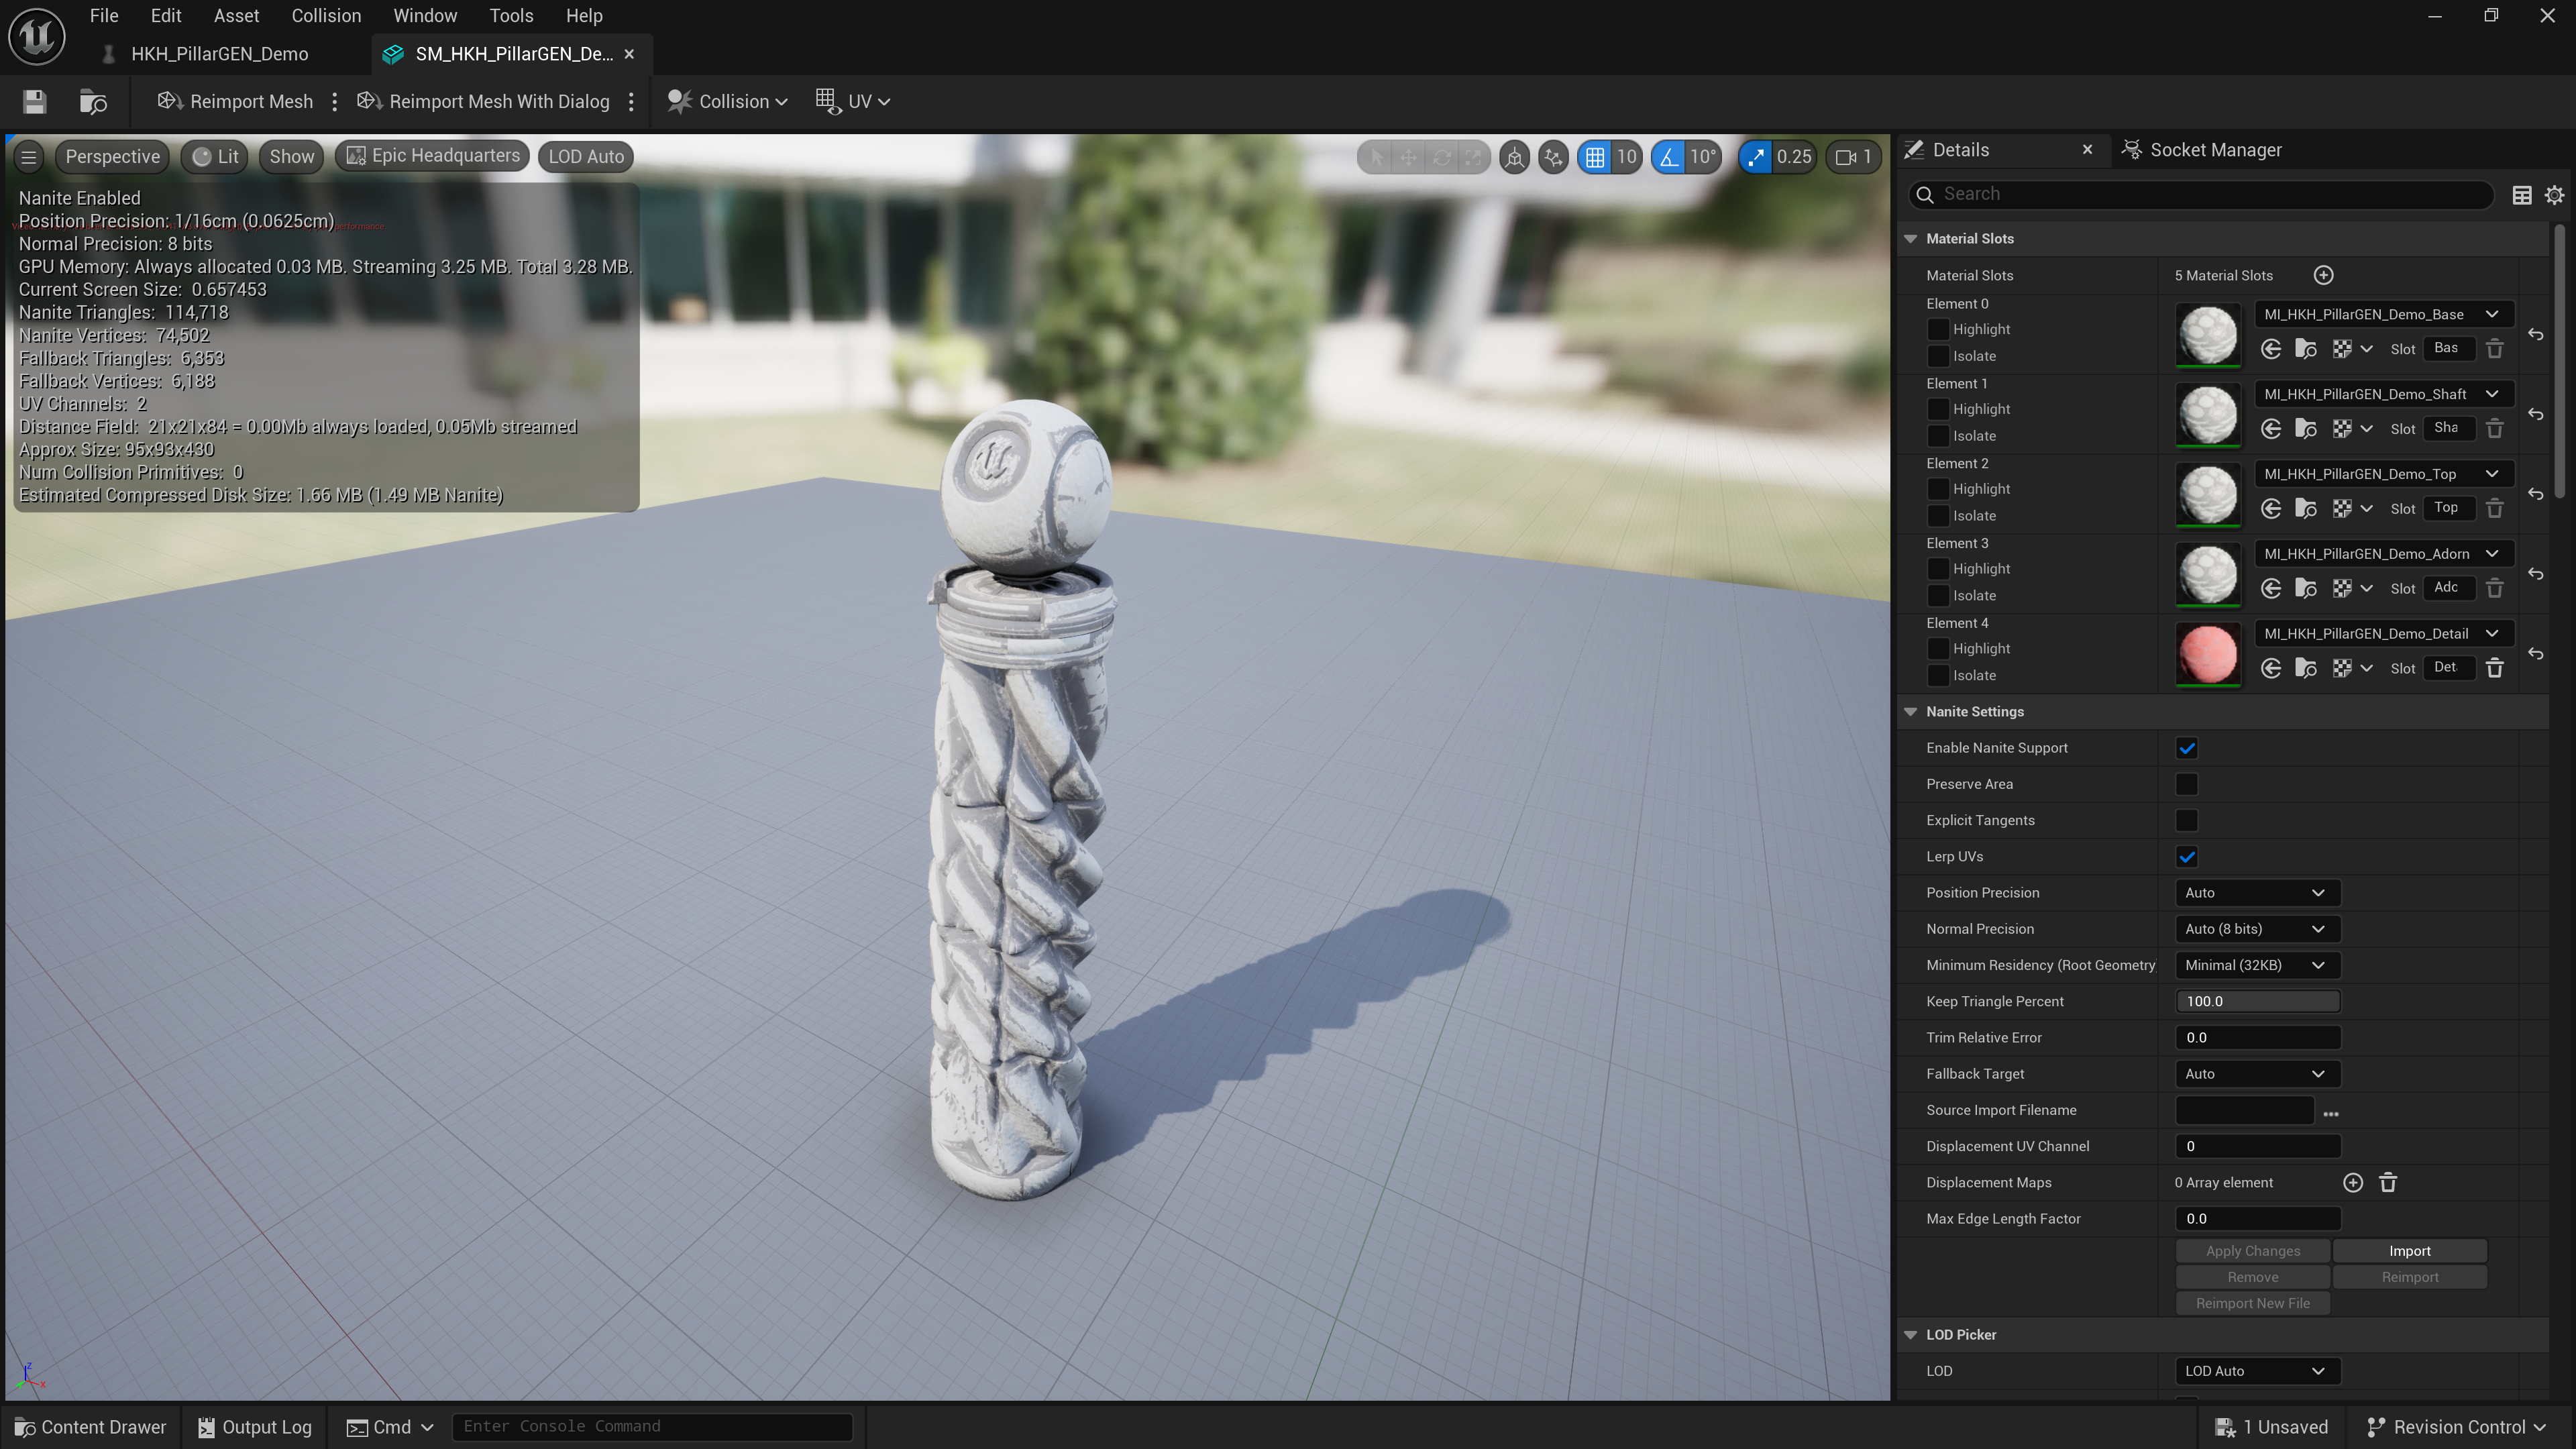
Every generated pillar can be baked directly into a StaticMesh asset, with collision, LODs, and UVs generated at build time. The workflow supports:
Nanite mesh conversion
UV parameterization via XAtlas / Automatic unwrap
Physics-ready low-poly mesh generation
Material slot creation & auto-binding
From a code standpoint, it leverages the UGeometryScriptLibrary_MeshAssetFunctions to write UDynamicMesh contents to disk, automatically assigning material slots based on procedural segmentation (Base, Shaft, Top, Adorn, Detail).
The Result
The HKH Pillar Generator delivers procedural geometry that looks sculpted — yet every vertex was computed mathematically. What began as a personal R&D experiment evolved into a full-featured Unreal plugin demonstrating how far GeometryScript and DynamicMesh can be pushed.
Unreal Engine 5 has been officially released and I’m very excited to be part of this moment!
As always, along these years, I have contributed with code and updated all my engine extensions to be compatible with this new digital interactive art authoring software.
I am super excited to announce that ‘Magic Nodes Plugin‘ is officially a Epic Mega Grants recipient for this year of 2020!
Thanks to Epic Games’ terrific generosity I have the path clear to move forward and make this tool grow to the point where it can be.
I also want to thank you, everyone out there who is a believer and has been using Magic Nodes, always providing me with awesome feedback.
Feel free to always get in contact with me through email or PM me if you use Magic Nodes and want to share your experience!
Thank you again, Tim Sweeney & all of Epic Games staff!!
Much appreciated!
Sometimes as developers we don’t Blueprints or C++ code to fail silently. Sometimes we need things to break to warn us that something unexpected went wrong. However at same time we don’t want our Editor crashing all the time either, we just need it to point us to the correct direction and then break execution, pop warnings, etc.
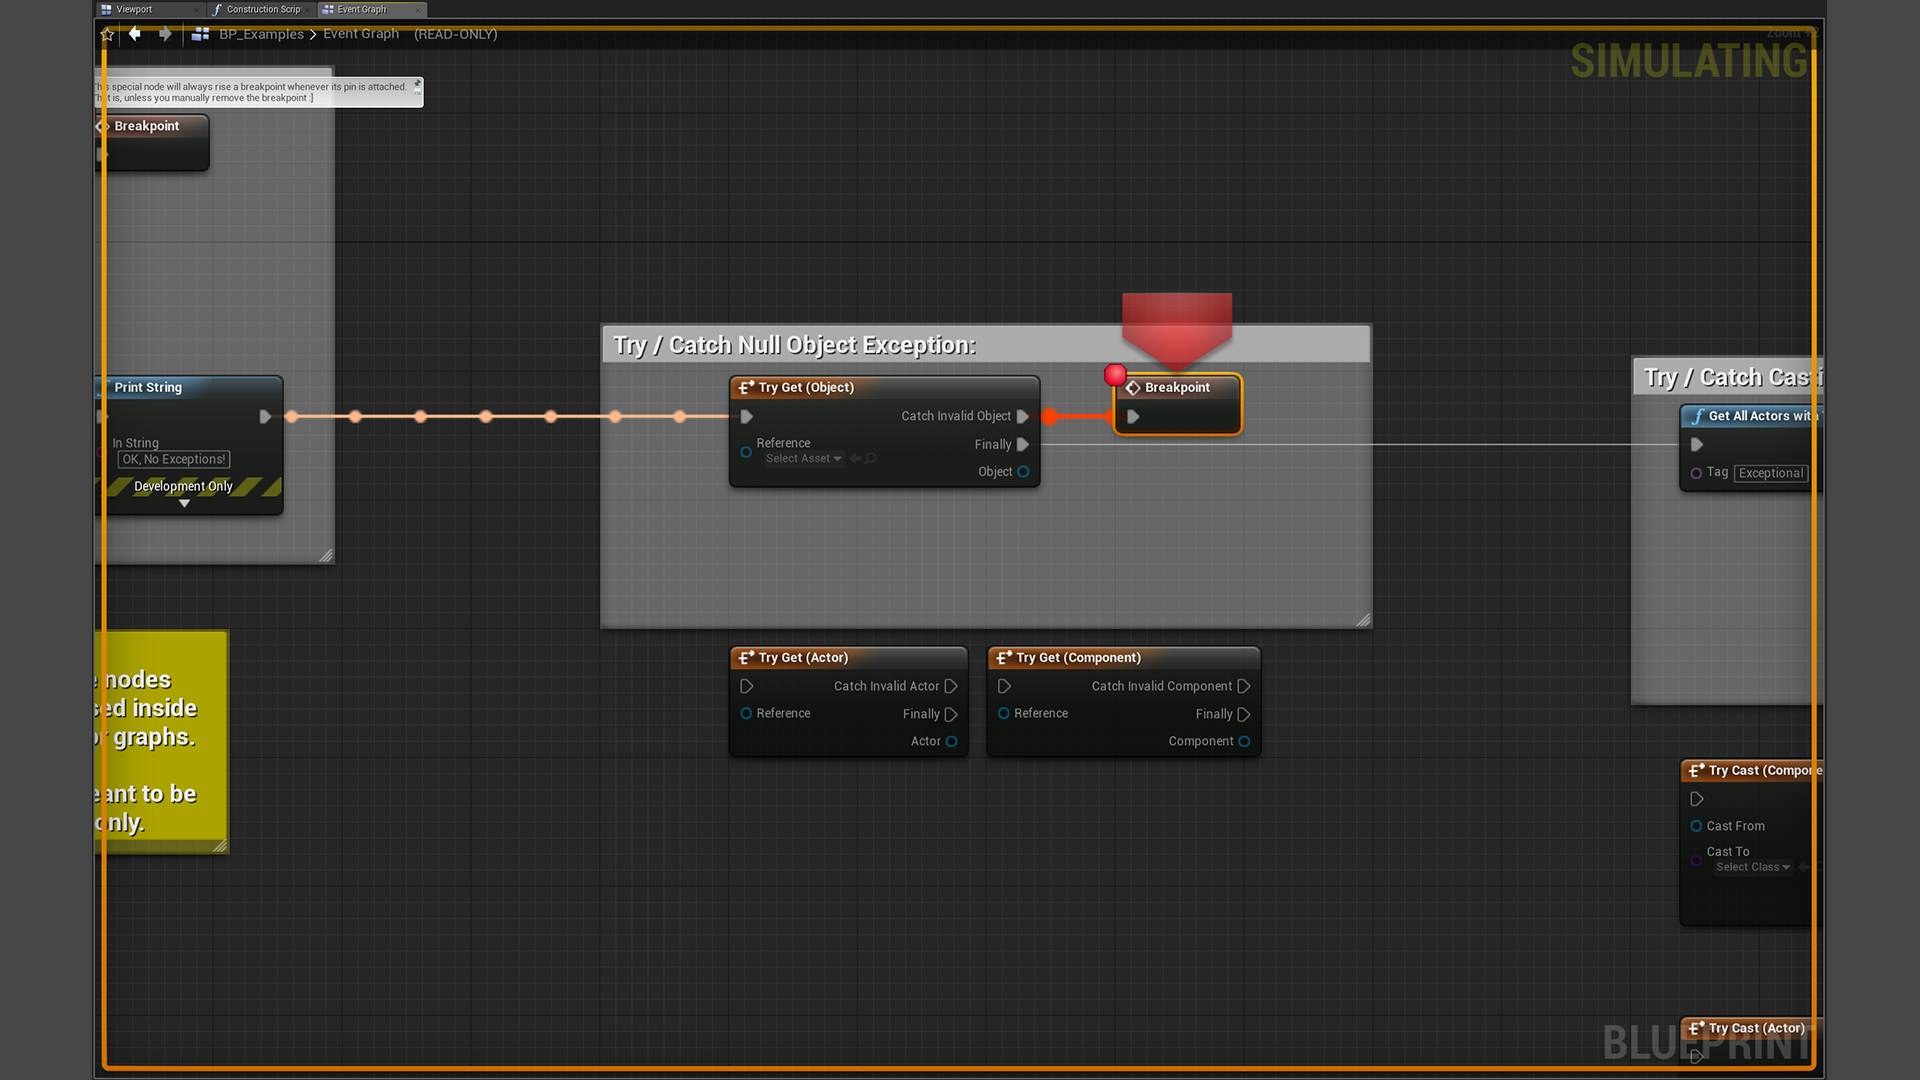
Exceptions are great for that. However, Blueprints do not implement nor provide any way to implement exceptions out of the box. So I built a library of self-explanatory custom nodes for that: To implement exception logic on top of Blueprints.
This plugin implements a friendly high-level exception handling library for Blueprints.
You can facilitate automation tests and help designers to have an easier quality of life when debugging game features, making use of Try / Catch / Break statements on Blueprint Uber Graphs.
There’s over 70 C++ classes to incorporate 20+ new nodes into the engine for that purpose:
Throw and log exceptions from graphs without crashing the Unreal Editor.
Catch Casting Failures before expending cycle resources on ‘Cast To’ nodes.
Catch Null Pointers, Invalid Object References, with logs for programmers.
Catch Invalid Property Values (Arguments) from gameplay graphs.
Prevent ‘Divide-by-Zero’ errors.
These nodes are very self-explanatory and can be found under the newly introduced “Exceptions” category of your Blueprints’ Master Graphs:
This library is due to release on Unreal’s Marketplace soon.
One of those things that “should be part of the engine by default”, but for whatever reason Epic Games isn’t interested in adding to the engine due to internal philosophies.
Recently I had to create a system to make materials remember several input parameters that are changed at runtime.
For infrastructure reasons, the project needed this to be implemented without involving any “Save Game” systems, to capture all parameters from existing dynamic material instances on scenes and restore them exactly like they were left when the application quit.
It had to serialize Scalar parameters, Vector parameter, and Texture2D reference parameters without care about saving or loading back any level or info about the actors using those material instances.
So I put together a plugin that captures and restores all dynamic materials of a scene that can later be restored, for persistent game worlds and interactive ArchViz projects.
The idea was to make it feel like a “save game” system, but without using any actual save game system with dependencies to the “Game World”.
There’s a “Capture Snapshots” and a “Restore from Snapshots” node that can be used to save and restore all runtime material states from a scene.
The materials must be “Dynamic Material Instances” to work. No workflow changes or changes to existing materials are required, the target meshes just have to properly use a Dynamic Material Instance to make it work.
Scalar Parameters, Vector Parameters, Texture Param2Ds are supported by the system. I decided to make it public and publish on Marketplace, Epic Games should have it available online in their store soon.
How To Use
This is extremely simple to use even for non programmers.
Step #1, your materials assigned to the meshes must be dynamic material instances, it’s an internal shader requirement of Unreal Engine due to how materials work.
From within your Blueprint’s Constructor Script you can do something like this to create and apply a dynamic material instance to your mesh:
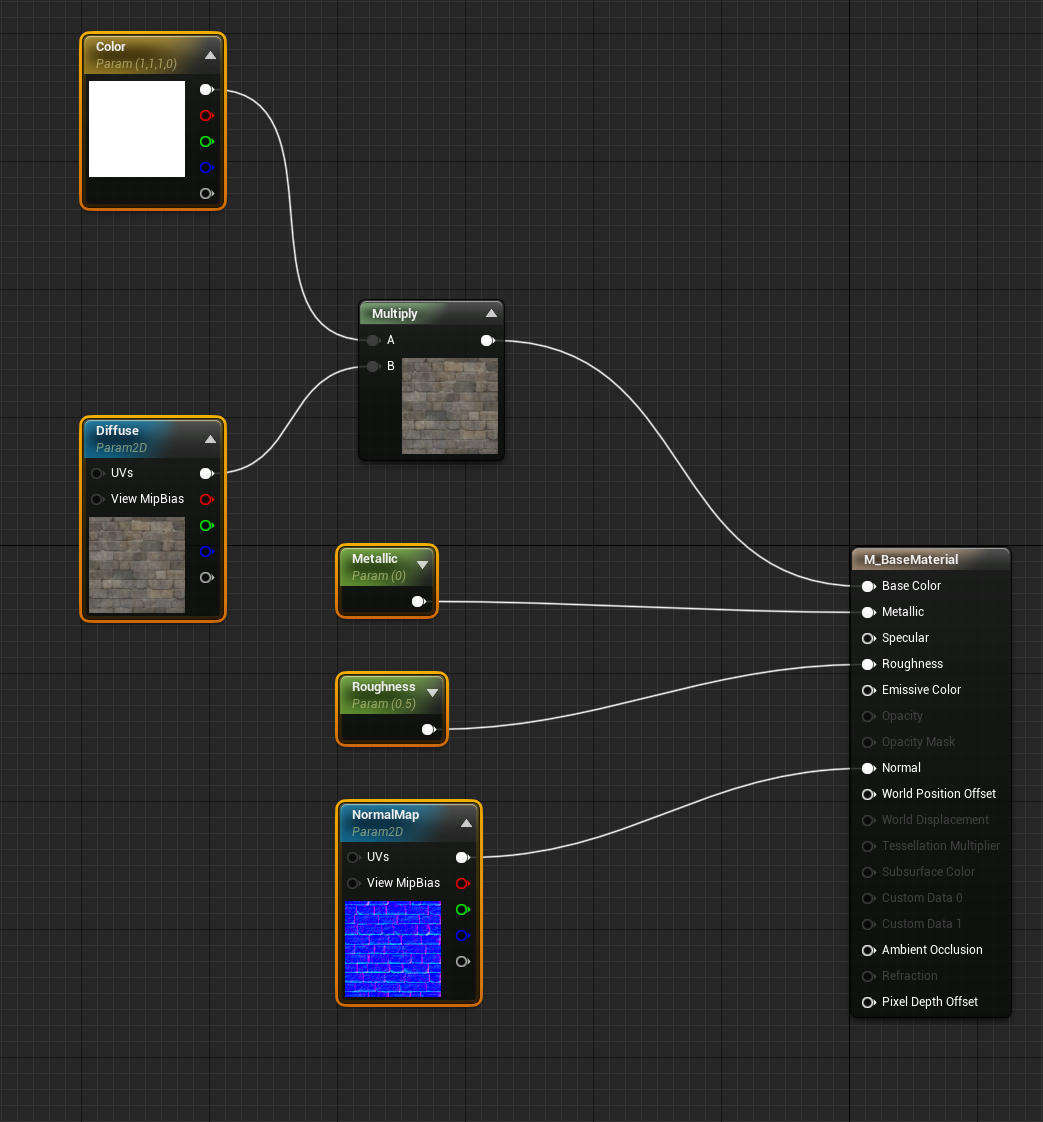
Step #2, the base material, the one you edit in Material Editor, it should contain dynamic parameters you’re willing to be changed at runtime and that the plugin will later record and restore recorded values from.
A very simple base material as example. “Color” vector, “Diffuse” texture, “NormalMap” texture, “Metallic” param, and “Roughness” param, are all parameters from the material below that can be changed at runtime and restored back to their changed values by the plugin even after the application was closed and then later executed again:
Step #3, to capture or restore material data. You just need to execute a variation of these nodes to do so.
“Capture Material Snapshots” will record every dynamic material instances and their parameters in scene.
“Restore Materials from Snapshots” will revert them instantly back to the state they were captured:
Note
Keep in mind that this system doesn’t make distinction of “levels” or “maps”, this is by design. A material named “MyCoolestMatInstance01” in multiple levels will be treated as one same material to be captured and restored.
I’ve put together a system which I call “Magic Nodes” where we can write some C++ functions in-place on any Blueprint Graph and that node will “morph” to match the input and output parameters of the function we wrote within the node itself. Reasons behind why I built this is, in part, because there’s numerous tasks where dragging wires on Blueprint Editor slows down productivity and this tool could be useful to address that, sometimes it’s simply faster to type a few lines of code instead of dealing with wire spaghetti!
With this I also hope, with time, Blueprint developers have a first contact with C++ code and slowly become comfortable moving to Visual Studio workflow later on, if wanted.
We can type some code, compile (hot-reload), and the node will “morph” its pins to accommodate and execute the function we wrote inside of it. This can be very handy for developers missing something in-between Blueprints and pure C++ code… Also it’s very useful to actually “read” right there what exactly that one node is doing.
While coding our functions in this node, we can have some basic auto-complete functionality as well. However keep in mind that I have no previous experience with any of this, turns out making an auto-complete feature is a beast of a complex task and I’ve implemented only the very basics! For example, in this screenshot the node detected I am trying to invoke a function from a ACharacter class, so while I was typing an auto-complete panel will popup, showing me functions and properties members of ACharacter class:
Workflow:
Here a quick intro of how these nodes are setup and how to make them work correctly for you… Because this is “real C++” (encapsulated into a safer environment), but still C++, these nodes require your Unreal Project to be a C++ project in order to execute. Magic Nodes rely on Unreal’s Hot-reload feature to be useful. The basic workflow:
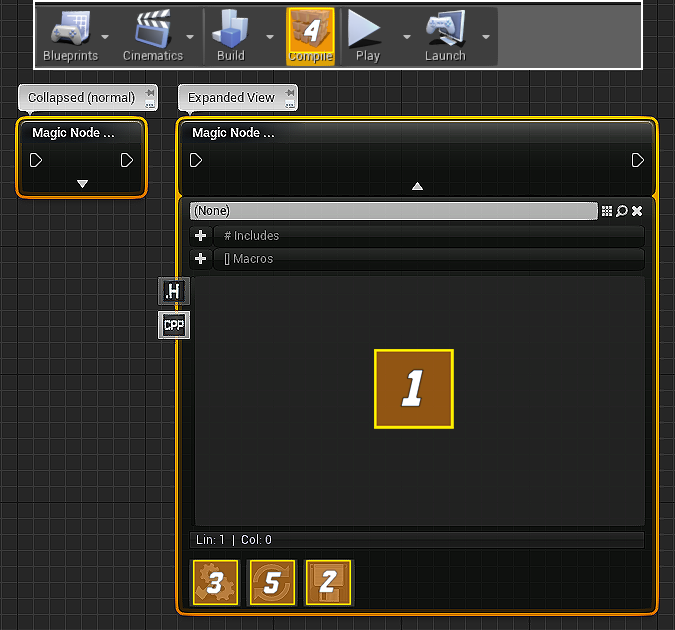
Just like regular C++, you have a Header field (H) and a CPP field (CPP) where you can declare and define you node’s functions, respectively. Alternatively there’s also a Type field (T) where you can declare any additional types such as enums, structs or classes that your node will use at runtime to execute the code you create.
Before compiling your changes, you have to save your node, that will update the “root source”, the source which stores your code and shares it with all the instances of your node. You can place on Blueprints multiple instances of your node, the source code to execute will be the same for all of the instances executed. “Ctrl+S” works as a shortcut for this save button.
Once you’re happy with your code, you need to compile the node, this first button from the Node toolbar. This will run a pre-compilation system that will examine your code… If everything seems correct the this pre-compiler will do all the work necessary to generate (or update) a native C++ class which is what is going to be executed at runtime once your game is packaged. That means that this node is just a “shell” holding the entry point of where and when your C++ code will execute within your Blueprint Graph. The node itself is purely visual and in reality doesn’t do anything besides display to you what it is going to execute. If the pre-compiler is happy with what it sees in your code you should hear a “success” beep sound confirming that it indeed generated the native node correctly.
If the pre-compiler is happy with your code, next step is to tell Unreal Engine to incorporate the node runtime into the Blueprint’s Graph execution flow. We do that by hitting the Hot-reload button from the main editor’s toolbar. This step is where the actual C++ compiler kicks in and catch any deeper defective code you might be trying to compile; If you can’t get past this stage, it’s a good idea to ask C++ veterans on Unreal’s forums, usually they can point out what exactly is wrong with your code.
Once Hot-reload compilation is complete, this is where the “magic” part comes in… Click the refresh button and the node, now properly compiled to binary library, shall update its input and output pins to reflect the entry function in your code (“FSelf::Execute” function). Once pins are generated and/or updated, you can proceed to link your target variables to it and/or set default values of your pins.
Example:
Let’s create a node which takes a reference to our Character Blueprint, subscribes a native (node’s internal) function to Character’s “Jump” event and then tells the Character actor instance in game world to jump… This example characterizes as a “Persistent Node”, it keeps running like an Async Function such as Delay Nodes. Of course, you could simply call the the “Jump” node instead and be done with it, but the point here is to exemplify how you can do that same action from Native C++ with magic nodes instead of calling one new Blueprint Virtual Machine‘s function for every single node you need to call (VM function calls in the end have heavy performance implications, they are orders of magnitude slower than native code and many developers end up converting good portions of their code to C++ because of that). The fact that we can add hundreds of functions to a Magic Node’s source and a call to that node is going to be just ONE call from the Virtual Machine, that’s a performance boost to be considered while at same time we don’t have to deal much with complex plugin modules setup (lot’s of boilerplate code) just to run our functions is also a workflow improvement, there’s much less support code to write on Magic Nodes…
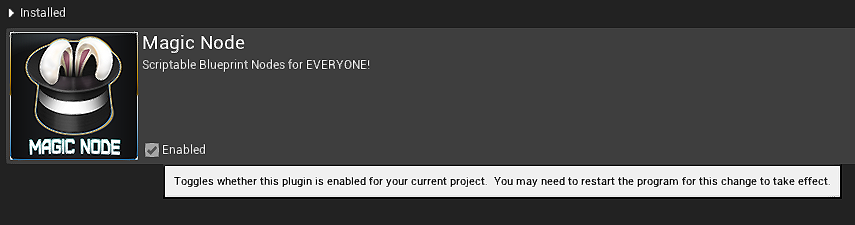
So, make sure that you have Magic Node plugin installed and properly activated:
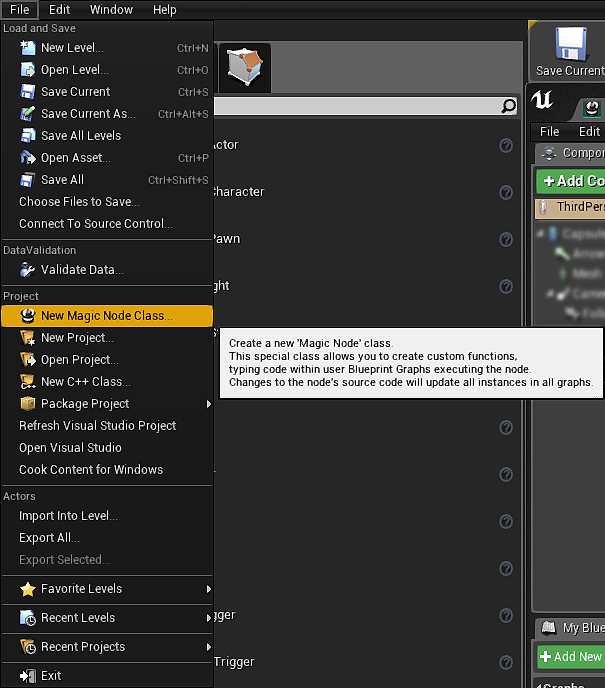
First we will need to create our “source”. We can do this from File -> Project -> “New Magic Node Class…“; That will create a new Magic Node pack in your content browser:
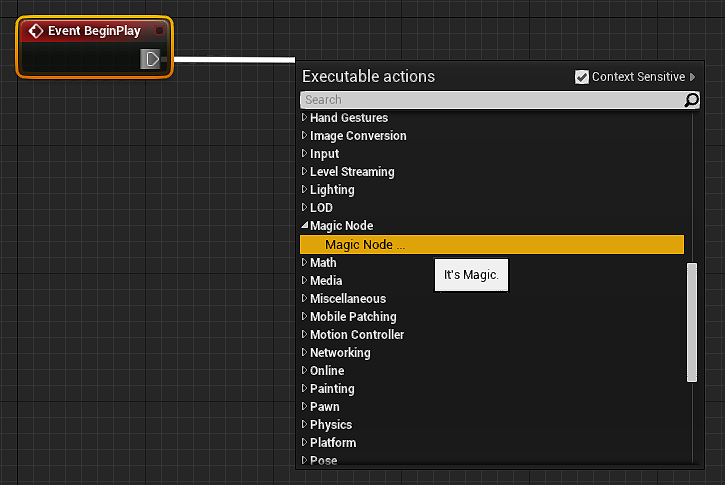
Once the source is created and named, let’s forget about it for now. Let’s go to our Character Blueprint and add a new Magic Node to its Graph:
We now have a “shell” to execute our node. By default it is empty, if you try to compile the Character Blueprint you’ll see Unreal’s Blueprint Compiler to complain about it:
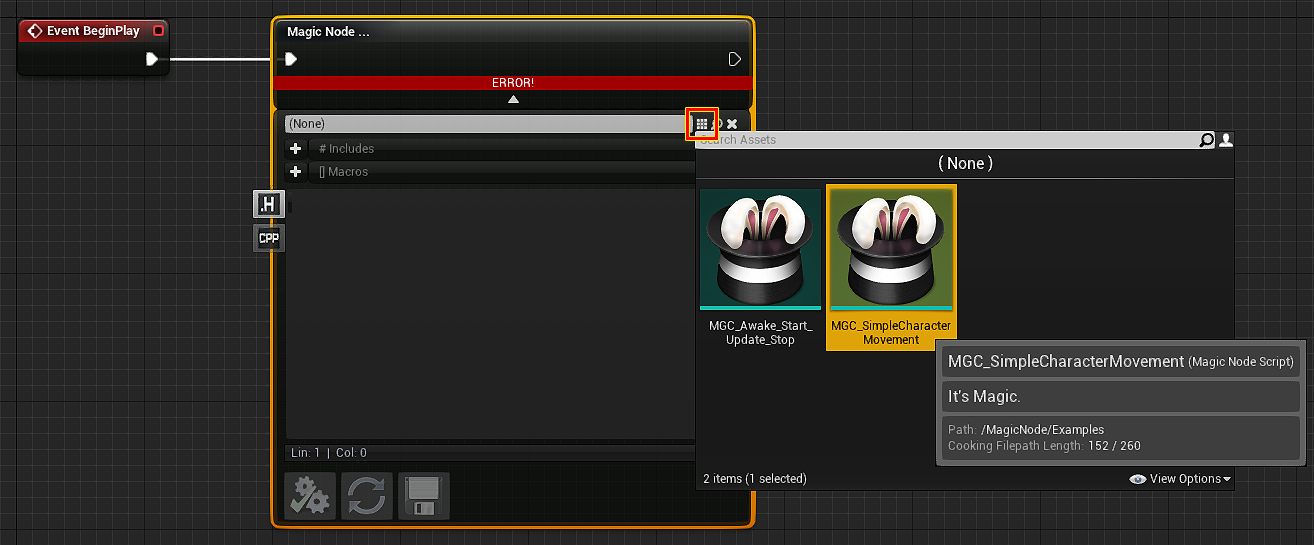
So, that source pack we have created before, we need to tell our shell to use that source we have created, for that we use the asset picker right below that error message on the node, it will bind this shell node to our source so we can start coding our functions in it:
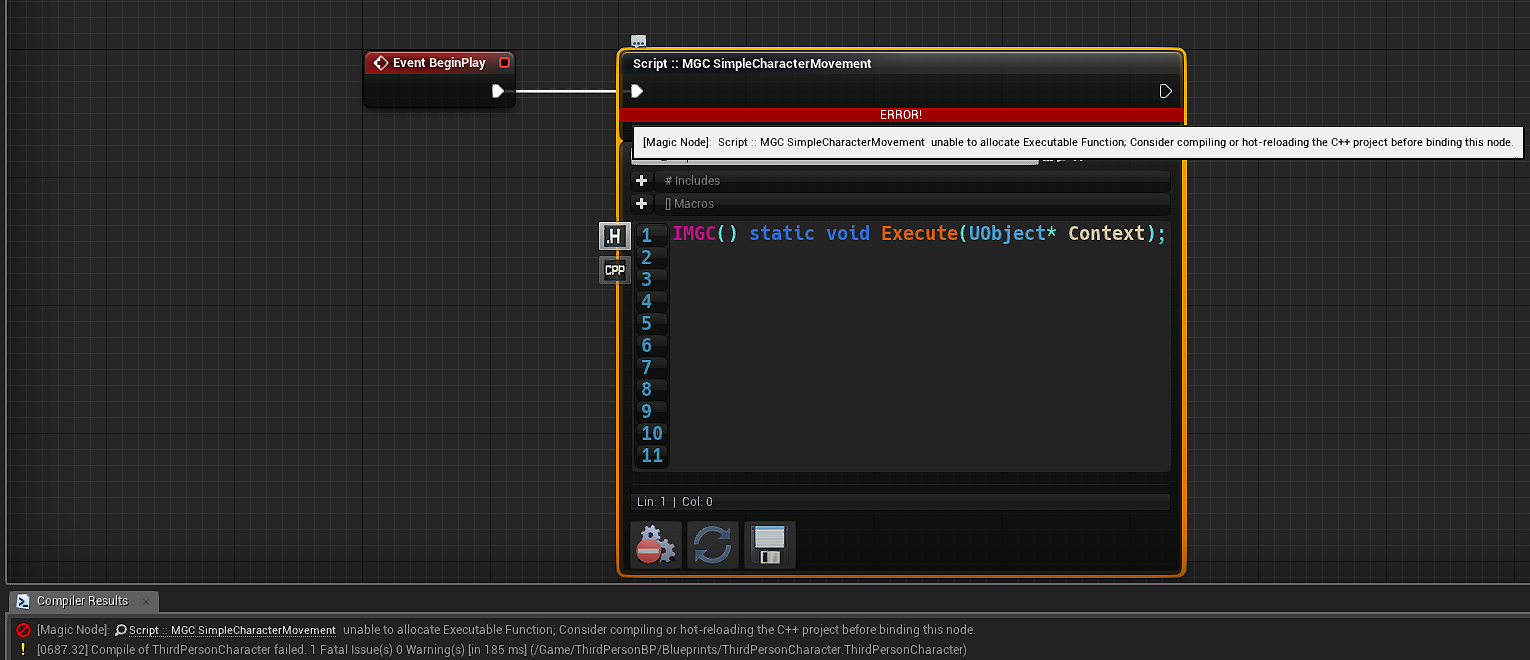
Now we have our source and the node shall become editable. If we try to compile our Character Blueprint once again, you might notice that it now recognizes our Magic Node as valid, however it will now complain it can’t allocate the entry point “Execute” function even though we can see it is there in our source. The reason why it is that way is because the runtime C++ only cares about compiled binaries, it doesn’t care or interact with any components of the Blueprint’s Virtual Machine:
We don’t have to care about that right now, let’s proceed and create our node’s code. To make it work, we’re going to directly use two member classes of Unreal’s Game Framework, Character class and Input Component class. To use them, we have to include the path to their respective header files; if you’re not sure where those headers are located you can type their types in your script ( ACharacter, UInputComponent ) then Ctrl+LMB them: The Magic Node will launch your browser and search Unreal’s API website for your looking for those classes pages. If the page exists, you should be redirected to these pages, at the bottom of the pages you can find the paths to their headers, here:
Click the “+” sign of # Includes row to include their paths:
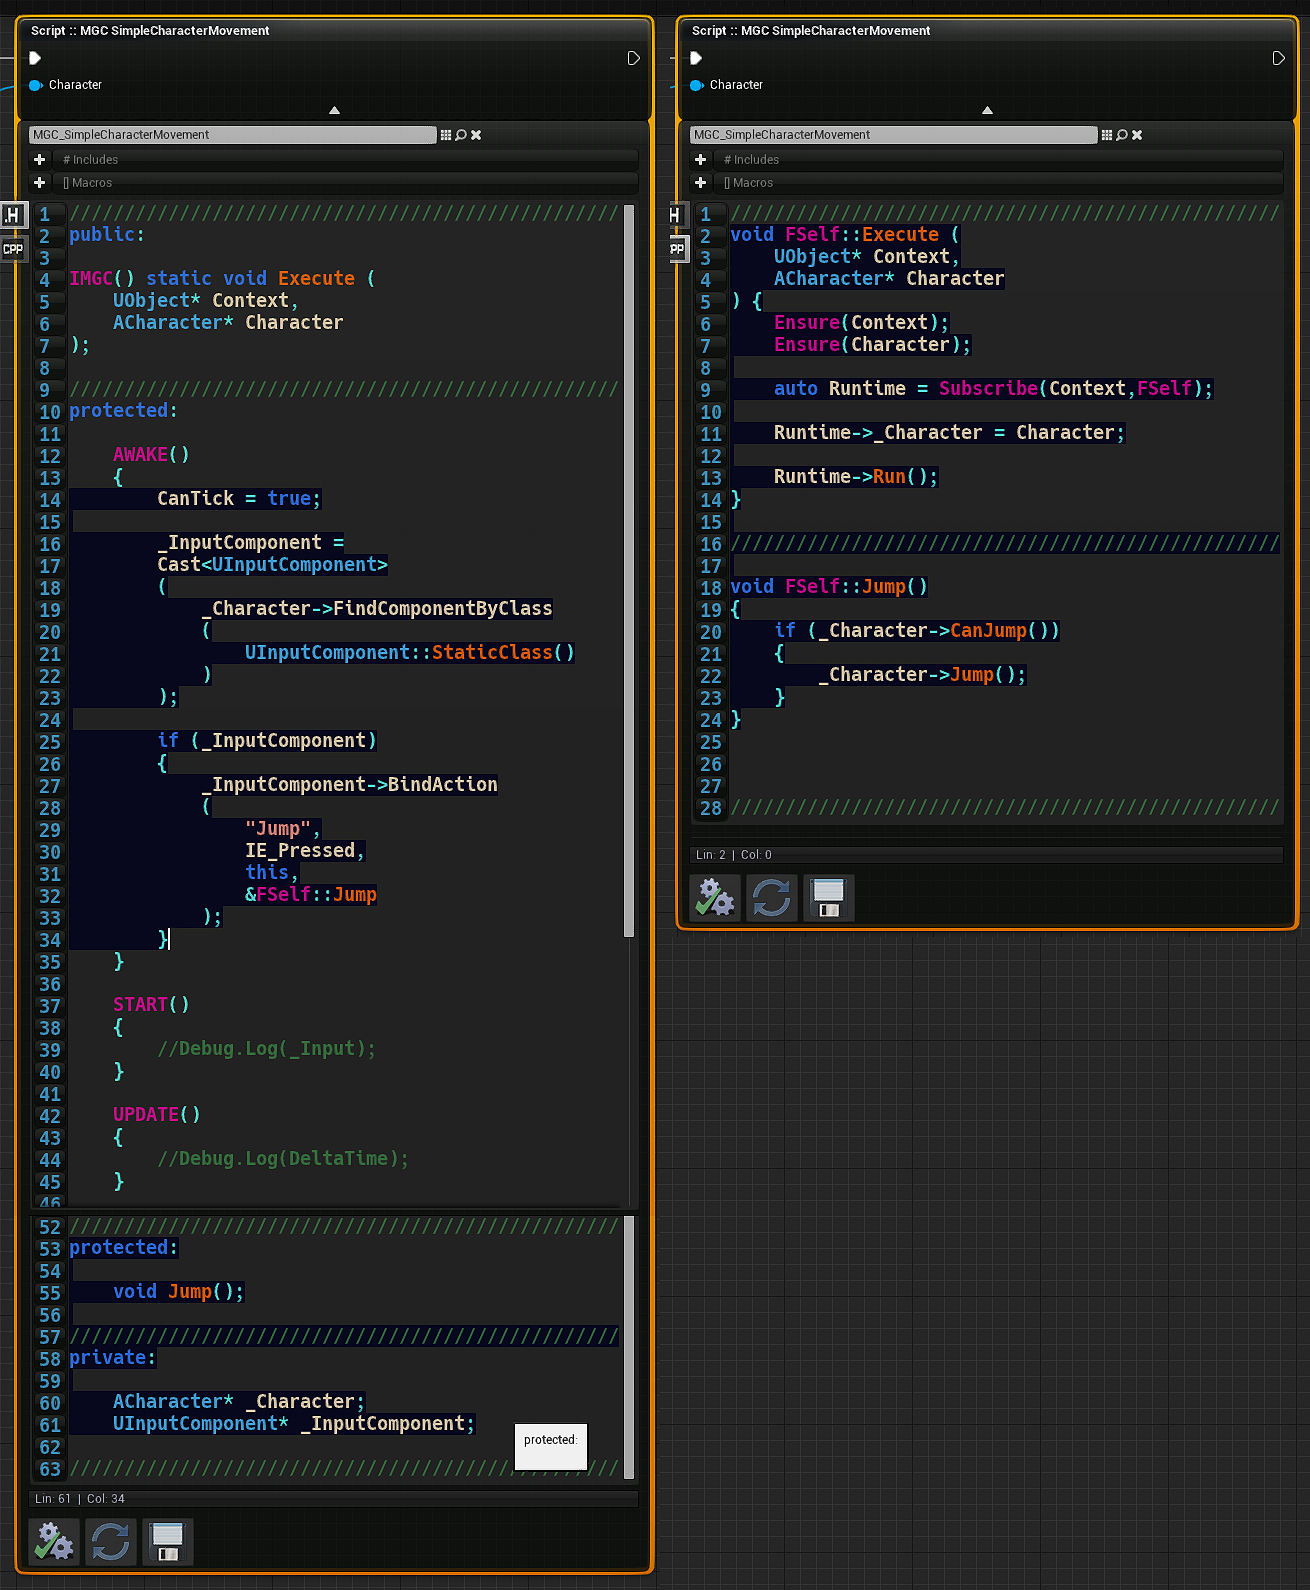
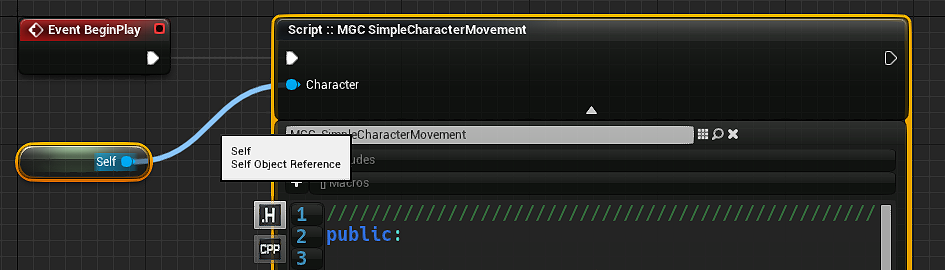
Done that, we now need to type some code to achieve our goal. Let’s add this functionality to our H section and CPP section of the node (don’t worry about the “Character” pin already visible here, that is only there because I have already compiled this node). Code to the left goes within the Header (H), right one goes within the CPP section:
FIX:
Epic Games team added the same “Subscribe()” function to Unreal Engine on 4.24 and above. To avoid problems then we have to use now “Enroll()” macro inside of Execute function, instead of the “Subscribe()” you see above.
Done that, let’s now save and pre-compile our node, from the node’s toolbar:
Then tell Unreal to compile the binary version of our node. Clicking the Hot-reload button:
Once Hot-reload compilation is complete, let’s head back to our node’s toolbar and click the “Refresh” button:
Done that, we shall now see that your Magic Node now displays an input pin called “Character”. Let’s attach to it a variable of our Character’s self Blueprint:
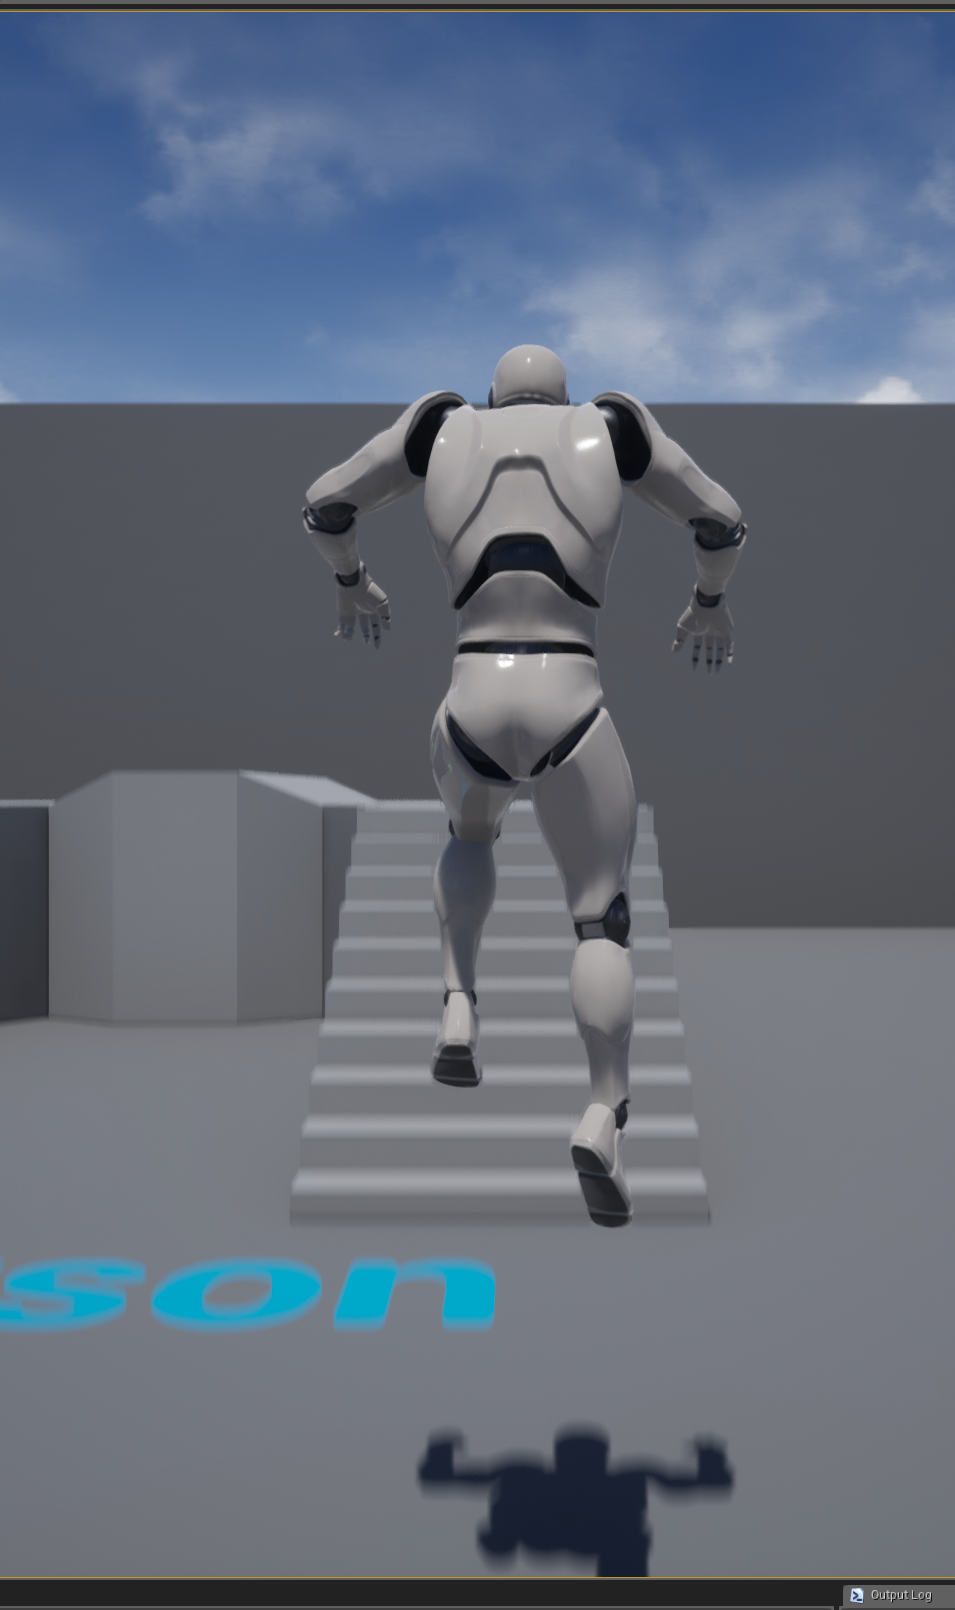
If you did everything correctly, now compile the Character Blueprint (Blueprint toolbar, not Hot-Reload) and then your Character Blueprint should now be happy and understand what have just made; When playing in editor, if you press the space key the character will jump (make sure you have input settings setup on project settings panel):
And that’s it, a quick example of how to run native C++ code on Blueprint Graphs without leaving the Blueprint Editor to work on external applications such as Visual Studio! If you leave the game running for a while though, the code will stop working… That will happen because Unreal will run a Garbage Collection operation and our Magic Node running will be destroyed. It’s simple to avoid that, because our node is latent (Persistent Node), we don’t want it to be garbage collected, so we just have to change the declaration and definition body of our “Execute” to output a self-reference, like this:
Then we save the script, pre-compile again, Hot-reload again and now after Refresh our node has an output pin. We promote the output to a variable (here named “Controller Script“) and make the Character Blueprint hold a reference to it, so while our Character Blueprint exists the Magic Node will never be garbage collected:
When we are done with it and want the node to be destroyed, all we have to do is set the variable “Controller Script” to null pointer. The next time Garbage Collector runs it will collect the remains of our node and destroy it as expected!
But what if we don’t need a persistent node? In this case it’s way simpler. We can write the whole functionality within the entry point “Execute” function. Doing so will NOT generate any garbage and the Magic Node will be a “Fire & Forget” type of node, it will be destroyed right after execution flow (white wires) leaves the Magic Node, just like any regular Blueprint nodes! Like this example node shown previously:
So, I’m running out of time for now, this should illustrate how the general workflow is meant to be when you create Magic Nodes. If you have doubts and questions, feel free to ask in the Unreal Engine’s public forums (link below).
Note: When you want your C++ classes to reference and use Magic Node classes from the Source/MagicNodes/ directoy, besides including a node’s respective class header, make sure you add the “MagicNodeRuntime” module dependency to your project as well:
“-We don’t make mistakes, just happy little accidents!” — Bob Ross Happy coding!
I was in need for a low-poly (real low) human male basemesh modeled with decent line loops for sculpting and prototyping some concepts inside Unreal Engine… Strangely, even though Unreal Engine’s community is a big one, I couldn’t find any resembling an actual human nor one below 50.000 polygons.
I mean, it’s nice to have all muscular volumes detailed everywhere, but for a naked skin character where clothing and accessories are later added upon, that many polygons is just too much for non cinematic character models.
Because of that, I took some time this last weekend to model and UV map a decent male basemesh accurately scaled and fitting EpicGames’ Mannequin Skeleton… And now I’m sharing with you, do whatever you want with it, sculpt your characters, rig, animate, etc*
* If you make models with this to sell on Marketplace, I see no problem at all with that, but I don’t know if Unreal Marketplace policies will allow you to do that.
This is a major update for the “Auto-Save Game” system I’ve been maintaining up on Unreal Marketplace for last couple years.
Focused on performance and data reach, I’ve totally scrapped original code and wrote this version from scratch, implementing a fully custom serialization engine that made possible for me to achieve the goal of moving away from the built-in ‘FArchive‘ system and it’s ‘ << ‘ operator constraints. The reasons why I moved away from the internal FArchive operator are many, so I won’t go too much into details about this… Instead, let me throw at screen the new ‘features‘ for you:
Savior 2 is tens of times faster than Savior 1.x releases.
Multi-Threaded Save & Load capabilities, no freezes or hiccups.
Save all data from outside your Game’s main thread, even Actor References.
Save any class. Any UObject is now supported, not just Actors or Components.
Versioning. Your Game will be capable of loading from old ‘*.SAV’ files after patches.
Encryption. All data goes through a lightweight, fast, multi-platform compatible encryption pass.
Optimized: Savior 2 is designed to predict and avoid crashes at all costs, no matter how complex Levels are.
Optimized: NO Components needed to be attached anywhere thus no memory eaten for the sake of storing data.
Optimized: NO destructive workflow. Existing Actors aren’t destroyed/replaced, keeping references alive and safe.
Optimized: NO containers created when saving game data thus no big chunks of memory garbage generated.
Optimized: Savior 2 Slots are UObjects, not Actor nor Component, avoiding large resource allocations.
Automatic Level Transitions on Load from Slot.
Threaded Save & Load the whole Game World or individual Actors.
Threaded Save & Load Game Mode in real-time, independent of Level.
Threaded Save & Load Streamed Levels without pausing the Gameplay.
Threaded Save & Load all Properties marked ‘Save Game’, no C++ required.
Threaded Save & Load any Dynamically-Created Classes of Actors and Components spawned in Runtime.
Threaded Save & Load Actor’s Scale, Location and Rotation, Linear and Angular Velocity automatically.
Threaded Save & Load Actor’s Visibility state, Collectibles’ or Particle Systems’ state automatically.
Optional Built-in HUD Class with auto generated Load-Screens with Blur, Splash-Screens or Videos.
Optional Built-in Progress Bar System with auto generated UI Elements for your Loadscreens.
Optional Built-in Slot Widgets with auto generated UI Slot Elements for your HUD Menus.
Optional Built-in support for Slot UI Thumbnails and UI/UX Decorators.